Capo helps you listen to your song more carefully, and play along with recordings at your own pace. It lets you adjust the song's tempo while retaining good-quality playback, offers looping regions that are automatically beat-matched to the song, and can change the key of a song to make it easier to sing or play along with.
Playing Audio
Tapping the Play button in the Heads-Up Display will start playback of the song from the current playhead position, except in the following cases:
- The Transcription Playhead is enabled, so playback will start from the location of the Transcription Playhead.
- A Region is selected, so playback will begin looping in the selected Region, starting from the beginning if Count-In is enabled.
Audio Scrubbing
During playback, seeking through the song by swiping the waveform will start Capo’s “Audio Freezer” scrubbing engine. Scrolling slowly will let you focus on specific sounds, and puts you in direct control of the sound being played so you can hold a note frozen in time while you try and identify it.
You can also start scrubbing by using two fingers to drag the waveform while playback is stopped. This is handy when you want to use scrubbing exclusively as your tool for identifying individual notes.
The Transcription Playhead
Enabling the Transcription Playhead (located in the Playback Control Strip) changes where the audio playback starts each time you press Play. Once enabled, the Transcription Playhead will save the current position of the song, and always starts playback from that point each time you press the Play button.
The Transcription Playhead is useful when trying to pick out individual notes, slurs, or licks, because you can always start playback from the same point without having to re-position the cursor each time. Once you are done with that note, you can move ahead by toggling the Transcription Playhead off, and then on again.
When used in concert with Markers, you can store the locations of notes or slurs that you want to hear repeatedly from the same point. Then, you can navigate between markers to move between those notes and phrases that you are trying to pick out.
Using Regions for Looping
You can create many Regions in Capo to mark sections that you'd like to repeat. Whether you're using Regions as a tool to hear something over and over again as you listen carefully or you use them to practice along with the original recording, Regions are very easy to use.
To add a Region to your song, use the Regions Control Strip and tap on the Add Region button. A new region will be created, spanning the current bar in the song.
Activating a Region
When you select a Region by tapping it, the region becomes active. It will highlight, and display a handle on either side. These handles are used to adjust the region's start and end points.
Resizing a Region
Drag either of the handles to resize the region. Regions cannot overlap one another, so you will not be able to drag past the start or end of an adjacent region.
Snapping
By default, Regions will be snapped to the nearest beat as they are resized.
If you'd like to adjust the Region without using the default beat-snapping behavior, drag your finger above or below the handles to disable snapping.
While a Region is selected, the Play button will change to indicate that playback will loop inside the selected region. You may also delete the selected region using the “Remove Region” button in the REGION controls located in the Control Strip.
Regions may also be renamed. To rename a Region, simply tap its title while selected and you can change its name to help you identify the sections you've marked for later practice or study.
Adjusting Playback Tempo
The most-used Advanced Playback feature is Capo's ability to modify the speed (or tempo) of the song's playback without significantly degrading audio quality, and without affecting the pitch of the song (like an old tape or record player.)
You'll find the slider that adjusts the playback speed in the Speed Control Strip.
The playback speed can be adjusted anywhere between 25% and 150%, where 100% matches the recording's original playback speed. Using the buttons on either end of the slider allow you to adjust in 1% increments, should you wish to hit a specific target speed.
Transposing Your Song
Using the slider in the Key Control Strip, you can transpose the song to a new key. As you adjust the slider, the chords and chord boxes will update automatically to reflect your changes.
Adjusting Playback Pitch
You can finely adjust the pitch/tuning of a recording using the slider found in the Pitch Control Strip. You can adjust the pitch of playback by up to a full semitone up or down.
This feature is most useful when working with older, out-of-tune recordings, and those that are not in tune with your instrument.
Isolation
Capo includes a cutting-edge isolation effect, powered by SuperMegaUltraGroovy's Neptune isolation engine. With just a few adjustments, you can easily extract or eliminate the instruments or vocals in a song.
Sound Sources
A stereo mix is made up of many sound sources such as a guitar, drums, bass, lead vocals, backup vocals, and so on. When a song is mixed on a mixing board, individual sources are panned between the left and right channels to create the illusion of positioning—this is sometimes called the sound stage.
By manipulating Capo's pan and width sliders, along with the frequency range control you can pinpoint these individual sound sources within a stereo mix so that you can hear them more clearly.
To access the Isolation settings, tap the button in the Playback Control Strip.
Solo / Mute
When the isolation effect is running in Solo mode, your isolation settings define the panning and frequency range of the instrument or vocal that you're trying to hear more clearly.
When the isolation effect is running in Mute mode, it behaves the opposite way as Solo. Your isolation settings define the panning and frequency range of the instrument or vocal that you wish to eliminate from the track.
Pan Energy
The Pan Energy display—as well as your ears—helps you locate the position of the source among the mixed song. While listening to the track play, you will see a display of the energy as it is spread across the stereo field. For example, when you see (and hear!) energy on the left-hand side of the mix, you know that you need to adjust the Pan slider to the left.

Pan
The Pan slider controls where in the stereo field that the sound source is located. When you adjust the pan slider, you will hear the sound update in real time as you make adjustments. It works similar to tuning an old analog radio (remember those?) and is just as easy to use.
Width
The Width slider is closely related to the Pan slider in that it allows you to adjust how narrow or wide a range to apply the isolation effect.
In some mixes, there are effects applied to sounds that cause them to occupy more of the stereo space than where the source was panned on the mixing board. In those cases, you might need to experiment with the pan and width sliders to find the entire range that your sound encompasses.
Frequency Range
The Neptune isolation engine allows you to define a frequency range in addition to the pan and width values described above, making it especially powerful. Just as with Capo's old Vocal Reduction feature, you can define a low and high frequency value that defines where your desired sound is located.
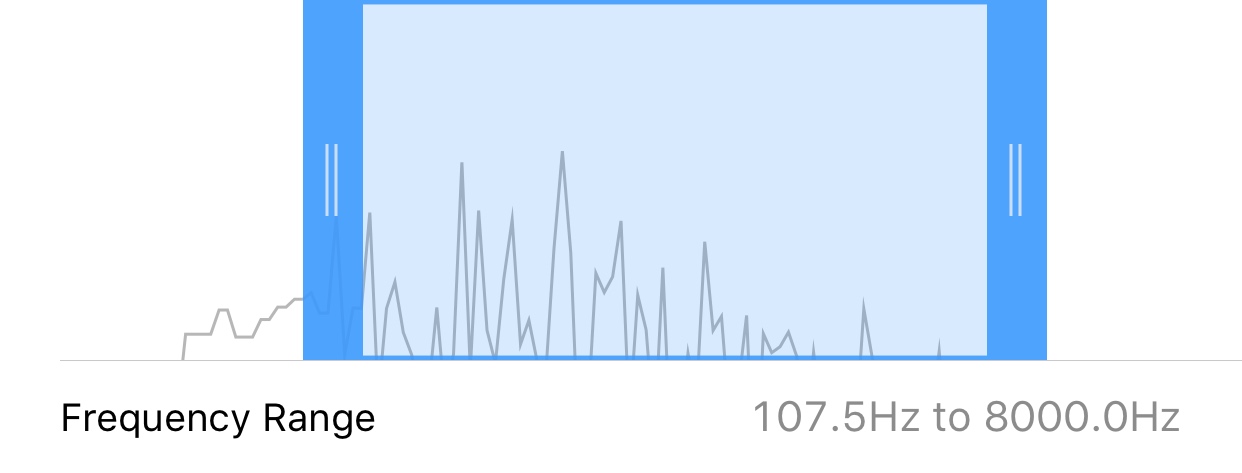
For example, if your goal is to isolate or cancel the vocals in a song, you can set a range from approximately 300Hz to 8000Hz to get started. This will ensure that the bass is not captured as part of the isolation process, and "splashy" cymbals and hi-hats won't muddle up the vocals. Adjust the frequencies at either end, and stop adjusting when you can hear the voice clearly.
Isolation: Tips & Tricks
Suggestions
For starters, listening with headphones or full-range speakers makes a big difference while adjusting the isolation controls. The higher fidelity equipment that you have to work with, the more you can hear the little differences that will tell you that your adjustments are working or not.
Also, a quiet environment with few echos can help for the same reasons. Sometimes the isolation effect can seem hollow or echo-y on its own (thanks to panned reverb in some mixes) so you want to be sure that it's the song, and not your room playing tricks on your ears.
Getting Started
This tool requires some exploration and experimentation, because no two mixes are the same!
Start by playing the song—ideally with a looping region around an area you wish to focus on. Enable the isolation effect by pressing "Solo" or "Mute". Play around with the pan by moving it from left to right—try and identify where in the stereo field the sound sources (the guitar, the bass, drums, etc) are located in the mix.
Now start to play with the frequencies. For example, if your goal is to isolate or mute the vocals in a song, you can set a range from approximately 300Hz to 8000Hz to start off. This will ensure that the bass is not captured as part of the isolation process, and "splashy" cymbals and hi-hats won't muddle up the vocals. If you’re trying to isolate bass, set the frequency controls to 20Hz at the low end, and 200Hz at the high end.
Sometimes while you’re trying to find a sound, it’s important to turn the Effect switch to "Off" once in a while to compare it to the "Solo" or "Mute" effect that you are trying to achieve. It’s not uncommon for your ear to go hunting for the stuff you are trying to eliminate, and you may not realize just how much those sounds have been reduced.
Recipes & Starting Points
Muting Vocals:
- Start with the Effect switch set to “Solo”.
- Adjust the pan slider so it’s positioned right in the middle.
- Set the width as low as it goes, because the vocals are typically mixed to the center.
- Select a frequency range that seems to capture much of the singer’s voice.
- Set the Effect switch to “Mute” to eliminate the vocals.
Soloing a Guitar:
- Set the Effect switch to “Solo”.
- Set the width slider somewhere in the middle.
- Adjust the pan slider until you hear the guitar sound you are after.
- Start dragging the width slider to the left to reduce interfering sounds.
- If necessary, adjust with the frequency controls on the low end until you hear the bass and kick drum disappear.
- If necessary, adjust the high end of the frequency range until the cymbals, hi-hat, and snare are reduced.
Tip: Try switching the effect to "Mute" and see if the guitar disappears completely. That's a sure sign that you nailed the settings.
Bass:
- Set the Effect switch to “Solo”
- Set the width slider somewhere in the middle
- Adjust the pan slider to the center
- Set the frequency controls to 20Hz at the low end, and 200Hz at the high end
- If necessary, try narrowing the width by dragging the slider to the left
- Now, adjust the frequency control further to suit the bass line you are trying to hear
Troubleshooting
The sound I’m chasing seems like it’s coming from “everywhere”!
If you’re finding that the target sound is “all over the place” in the mix, then you might want to try a reversed approach. Attempt to eliminate the stuff panned in the center, as with the vocal reduction steps above. Sometimes that’s the only way you’ll get a clear sound of the non-centered instruments.
I can’t seem to make this work with my music!
First of all, isolation only works with stereo songs. You can tell whether isolation is being run on a mono track if the pan energy display is showing a thin, straight line in the middle and nothing else. These are rare nowadays, but it’s worth eliminating that possibility first.
Second, your success is highly dependent on how the music was mixed. If the instrument you are chasing was mixed closely to another one in the stereo field with the same frequencies, then you’ll have a lot of trouble. For example, if the vocals and an acoustic guitar were both mixed equally to the center, then there isn’t much hope in separating the two.
With that said, you can still get some benefit from using the frequency range control to prevent the bass or percussion instruments from leaking in.
In modern music, quite a lot of the energy gets smashed right up near the center of the mix, so it can take a little bit more time to dial in the sound you’re after. Still, if you ever get stuck in these cases, you can get very far by eliminating the vocals, bass, and drums right in the center of the mix to hear all the instruments more clearly.
What kinds of music does isolation work best with?
We recommend that you find some older recordings to practice with, since they often mixed with far less complexity. Instruments were often segregated clearly with different pan positions, and often times a guitar or piano would be placed very prominently in either the left or right channel.
Also, live recordings can be a great source of material to test isolation with. Generally, these recordings are mixed to preserve the positioning of the players on stage to give you the feeling of being there, and hence you will find energy spread evenly across the stereo field.
Count-In & Metronome
To show the Count-In and Metronome settings, tap the or button located in the Playback Control Strip.

Here you can toggle the Metronome—a click track that will play in time with the recording using Capo's detected beat locations. When enabled, your chosen Sound will play along with every beat to help you keep time. The button will highlight to let you know that the feature is enabled.
When the Metronome is enabled, you can choose a Count-In duration of 1, 2, or 4 bars. Choosing a value other than Off will play the click for your chosen duration before a Looping Region begins playback. When a Count-In value is selected, the button will be shown in the Playback Control Strip, and when the Metronome is also enabled that button will be highlighted to indicate the count-in feature is active.
Legacy: Time Signatures
Because the beat editing tools are not available on all devices and OS releases, we left the above screenshot and this section in place for our users that have not yet upgraded to a newer OS and/or device. Please see the section on editing beats to learn more about this new feature.
At the very top of these settings you'll notice a list of time signatures. Choosing a different time signature will change how Capo is interpreting its detected beats.
Adjusting the Mixer
You'll find the Mixer controls in the Playback Control Strip. Tapping the Mixer button will give you controls for adjusting the playback volume of the song, the chords (i.e., the sound played when you select a chord), and the metronome.
Using the Mixer is especially handy when a song is particularly loud, and drowns out the sound of the metronome being played while you are using the Count-in feature.
Last updated: January 27, 2019