One of Capo's most powerful features on macOS is the ability to capture notes from instrumental solos, melodies, and bass lines directly onto the spectrogram. The spectrogram gives you a visual representation of the music's frequency content over time, making it possible to see which notes are being played and when. Combined with Capo's slow-speed playback and looping tools, you can work through even the fastest passages and document what you're learning.
Note entries in Capo serve as memory aids and learning tools. When you return to a Project after days or weeks away, your note entries remind you what you've figured out. As you enter notes, Capo provides immediate audible feedback—both when you click on the spectrogram and when you click on existing note entries. Once you press play, Capo plays your note entries synchronized with the original recording, letting you verify you've captured the right notes by comparing what you entered with what you hear.
This chapter is your guide to working with note entries in Capo. You'll learn how to read the spectrogram effectively, enter and verify notes with audible feedback, understand how guitarists can use string positions to locate notes on the fretboard, and develop an efficient workflow for learning solos and melodies.
Note: Transcription features require the Tabbing Song View, which is only available on macOS.
Reading the Spectrogram
The spectrogram is a visual representation of frequency over time. Understanding what you're looking at is the first step toward effective transcription.
What You're Actually Seeing
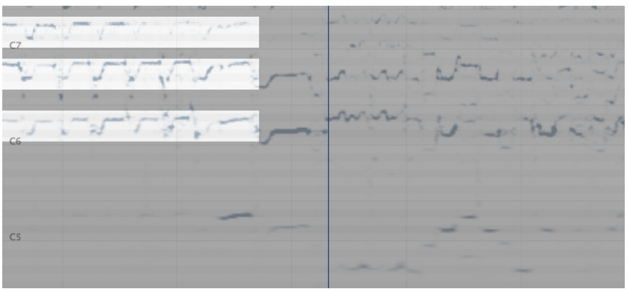
The spectrogram displays the intensity of notes over time—a much richer visualization than a typical flat audio waveform. The vertical axis represents frequency (pitch), with lower notes at the bottom and higher notes at the top. The horizontal axis represents time, just like a waveform. The intensity of each frequency is shown through the visual weight of the display—stronger frequencies appear more prominent.
When you look at the spectrogram, more prominent areas indicate stronger frequencies. A single sustained note appears as a horizontal line at the appropriate pitch. As notes change over time, you see the patterns move up and down, creating a visual map of the melody or solo.
The spectrogram reveals all kinds of musical information that's impossible to see in a waveform display—note bends, vibrato, slides, and even individual notes within chords become visible. For transcription work, this visual feedback complements what you're hearing and helps you place notes accurately in time.
Identifying Individual Notes vs. Harmonics
Many instruments produce harmonics—multiples of the fundamental frequency—when they're played. If you play a C4 on a guitar, for example, you might see visible lines appearing at C5, G5, and higher. These are harmonics, and they're part of what gives each instrument its characteristic sound.
This can be confusing at first. When you look at a single guitar note on the spectrogram, you often see multiple parallel lines stacked vertically. The lowest line is typically the fundamental frequency—the actual note being played. The lines above it are harmonics at intervals like a perfect 5th, an octave, or more above the fundamental.
Different instruments have different harmonic characteristics. A distorted electric guitar produces very rich harmonics that can be as prominent as—or more prominent than—the fundamental frequency. A clean acoustic guitar or piano has subtler harmonics. These harmonic patterns are part of what makes each instrument sound distinct.
Here's where it gets tricky: Sometimes the fundamental frequency isn't actually there at all. The sound consists entirely of harmonics, yet your brain perceives the missing fundamental clearly. You might see prominent lines at C#6 and G#6, but what you're actually hearing is C#5—an octave below the lowest visible frequency. This is why clicking on the spectrogram to hear the audible feedback is absolutely essential. The visual display shows you what frequencies are physically present in the recording, but your ears tell you what pitch you're actually perceiving.
Recognizing Guitar Techniques
The spectrogram makes many guitar techniques visible. Here's what common techniques look like:
Vibrato is quite easy to detect, as it has a very obvious wavy pattern. The note moves slightly above and below the target pitch in a regular rhythm. Capo's spectrogram doesn't just tell you that vibrato is present—you can also deduce both the depth (how far the pitch varies) and rate (how fast it oscillates) by looking at the pattern.
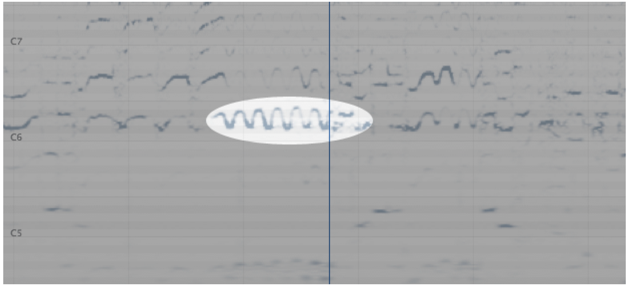
Bends can sometimes look similar to vibrato if done quickly, but the telltale sign of a bend is that two distinct notes are connected quite clearly. The pitch smoothly transitions from the starting note to the target note. Compare this to vibrato, where the start and end note is not usually held for very long, and the pitch often over- or under-shoots the target.
Slides are usually easier to hear than to see, but they have a distinctive appearance. Slid notes show gaps in their path, with the pitch landing cleanly at semitone positions. This corresponds to the individual frets being hit as the finger slides along the fretboard. In contrast, a bend has a totally clear, continuous path from the origin to the destination pitch, because nothing is stopping the string from producing all the frequencies in between.
Spotting Chords vs. Single Notes
When a chord is strummed on a guitar, you'll see notes appearing in a vertical group—multiple pitches starting at nearly the same time. Using the spectrogram to identify chords like this can help you determine a particular voicing of a chord you're hearing.
Be careful, though—don't mistake harmonics for chords. Remember that a single note with rich harmonics can produce multiple visible lines. The difference is that chord notes are spaced at musically meaningful intervals (like thirds, fourths, or fifths from the root), while harmonics follow a different pattern (typically octaves and perfect fifths above the fundamental).
Common Visual Tricks and How to Avoid Them
The spectrogram can play tricks on you, and understanding these pitfalls will help you avoid mistakes:
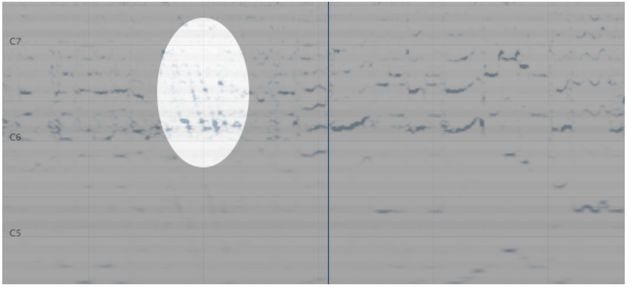
Harmonics are the biggest culprit. As we discussed earlier, harmonics appear all over the spectrogram and can be confusing. They appear at different frequencies than the fundamental—they can even appear at lower frequencies in some cases! To make matters worse, sometimes the fundamental doesn't appear at all. The example below shows a repeated bend from C#6 to D#6, with harmonics appearing 7 semitones up (a perfect 5th) and 12 semitones up (an octave). This rich harmonic character is characteristic of a guitar playing with distortion.
If you listened to this passage, though, you would hear that it's actually a C#5/D#5 bend—an octave lower than what's most visible. In this case, you would enter notes for C#5/D#5, despite not seeing any clear indication of those pitches visually. This is a perfect example of why your ears must lead and the spectrogram must follow.
Percussive transients from drum hits, pick attacks, or other rhythmic elements can create brief vertical streaks across many frequencies. These aren't notes—they're just the noise of the attack. Don't try to transcribe these.
Dense mixes can make individual notes hard to isolate. When multiple instruments play in the same frequency range, their spectrogram patterns overlap and become muddy. In these situations, slow down the playback and rely heavily on your ears.
Room reverb and effects can leave trails behind notes, making it unclear exactly when a note ends. Focus on when the note starts, and don't worry too much about perfectly capturing every bit of sustain or reverb tail.
When the Spectrogram Isn't Enough
The spectrogram has a critical limitation: it only shows frequencies that are physically present in the recording. As we've discussed, you often perceive pitches that aren't actually there—the missing fundamental phenomenon means your brain constructs a pitch from the harmonics alone. What you see visually might be harmonics an octave or more above the note you're actually hearing.
This is why the audible feedback when you click on the spectrogram is absolutely essential, not optional. When you click, you hear the pitch your brain is perceiving, which is what you need to capture. The spectrogram shows you frequencies; your ears tell you notes.
Additionally, notes can be buried in dense mixes, obscured by other instruments in the same frequency range, or too quiet to show up clearly. Sometimes the mix engineer has applied EQ that removes the fundamental frequencies entirely, leaving only harmonics. Sometimes the recording quality just isn't good enough to produce a clear spectrogram.
The workflow is ears first, spectrogram second. Use your hearing to identify the pitch. Click to create the note entry and verify it sounds right. Then use the spectrogram to refine timing and placement. The spectrogram is a tool to supplement your ears, not replace them. As you gain experience, you'll learn when to trust the visual display and when to rely more heavily on what you're hearing.
Entering and Editing Notes
Once you can read the spectrogram, you're ready to capture what you're hearing by drawing note entries directly onto the display. Capo provides immediate audible feedback as you work, making it easy to verify you're entering the correct notes.
Drawing Note Entries and Hearing Feedback
Entering notes in Capo is as simple as "drawing" them atop the spectrogram. Click and drag anywhere in the spectrogram area to place a note entry—the horizontal position determines when the note starts, the vertical position sets the pitch, and the length of your drag sets the duration.
Here's the crucial part: When you click in the spectrogram without dragging your mouse, Capo plays the sound of the note that would be placed at that location. This audible feedback is essential, not optional. As you learned in the previous section, the spectrogram shows you what frequencies are physically present in the recording, but your ears tell you what pitch you're actually perceiving. What you see visually might be harmonics an octave or more above the note you're actually hearing.
The workflow is ears first, spectrogram second:
- Use your hearing to identify the pitch you want to capture
- Click on the spectrogram where you think that note should be
- Listen to the audible feedback—does it match what you heard?
- If it sounds right, drag to create the note entry
- Use the spectrogram to refine timing and placement
If the feedback doesn't sound like what you expected, don't enter the note there—try a different octave or position. The spectrogram can play tricks on you, so be sure to continue using your ear and clicking to verify notes before you commit to entering them.
You might find that you'll enter notes that aren't actually being played, or notes played by a different instrument. That's normal—it's easy enough to fix, and you'll get better at distinguishing what you're hearing with practice.
Verifying Your Work with Playback
Once you've entered some notes, press play to hear them synchronized with the original recording. Capo plays your note entries alongside the music, letting you verify you've captured the right notes by comparing what you entered with what you hear.
The Mixer becomes invaluable for verification. You can adjust the balance between the original recording and your note entries:
- Turn down your note entries to focus on the original recording
- Turn down the recording to isolate just what you've entered
- Balance both to hear how well they align
Listening with the recording muted (or turned way down) makes it easy to catch mistakes. If your note entries don't sound like the melody when played alone, you know something's wrong.
When you click on existing note entries, you'll also hear audible feedback using the duration of the note as you drew it. This is helpful for quickly checking individual notes without having to play back the entire section.
Adjusting Timing and Duration
As you verify your work, you'll often need to adjust when notes start and how long they last. Select any note entry by clicking on it—the entry turns pink to indicate it's selected.
Once selected, you can:
- Drag the note left or right to adjust its start time
- Drag the right edge to change its duration
- Drag the note up or down to change its pitch
Make small adjustments and listen to the feedback to ensure everything aligns correctly. Precision matters, especially for fast passages where timing is critical.
Selecting and Deleting Note Entries
To select a single note entry, simply click on it. The note turns pink to show it's selected. Press the delete key to remove it.
For working with multiple notes at once, hold the Shift key while doing one of the following:
- Click on individual note entries to add them to your selection
- Drag the mouse (taking care not to start on an existing note entry) to select a group of entries with a selection rectangle
Once you have multiple notes selected, you can delete them all at once by pressing the delete key. This is useful when you've transcribed a passage incorrectly and need to start over, or when you've accidentally captured notes from a different instrument.
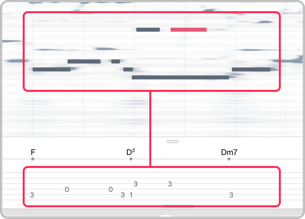
Working with Guitar Tablature
For guitarists, note entries can help you remember where notes are played on the fretboard. While Capo's tablature display doesn't include advanced notation like bends or hammer-ons, it's useful for quickly locating which fret and string to play when you return to a Project later.
How Capo Assigns Notes to Strings
When you enter a note on the spectrogram, Capo automatically displays it in the tablature section below. As guitarists know, most notes can be played in multiple places on the fretboard—the same pitch might appear on different strings at different frets.
Capo uses a simple default assignment: it always picks the same string for a given pitch. It doesn't try to optimize for hand position or playability, which means the chosen string location may not match how the song is actually played. For example, a note might be assigned to the high E string when it's actually played on the B string higher up the neck.
This is intentional simplicity. Capo shows you the notes—then it's up to you to adjust the string positions to match the original performance or your preferred fingering.
Changing String Positions
You can manually change which string a note is assigned to in several ways:
- Option-click on an existing note entry to move it to a lower string position
- Shift-Option-click on an existing note entry to move it to a higher string position
- Right-click on a note entry to reveal a menu for selecting the string position directly
As you adjust string positions, you'll often find patterns that make the fingering more logical—keeping notes on adjacent strings, staying within a position on the neck, or matching idiomatic guitar patterns. This is part of the transcription process: not just capturing what notes are played, but understanding how they're played.
Working with Non-Standard Tunings
If you tune your guitar differently or play another stringed instrument altogether (like mandolin, banjo, etc.), the tablature display can be adjusted. You can select a different tuning and/or instrument in the same place that you adjust the chords display.
When you change the tuning, Capo recalculates how notes map to the fretboard. A note that appeared at the 5th fret in standard tuning might appear at the 3rd fret in Drop D, for example. This makes Capo useful for learning songs in alternate tunings—you can see exactly where to fret each note for your specific tuning.
Note Entries for Non-Guitarists
If you're a pianist, horn player, or other non-guitarist, don't let the tablature display intimidate you. The pitch information and synchronized playback are still valuable for learning melodies and verifying what you've figured out, even if you ignore the tablature section entirely.
When you click on the spectrogram, you hear the pitch. When you enter a note, it plays back synchronized with the recording. That's useful for any instrument. The tablature is simply an additional visualization for guitarists—it doesn't affect the core transcription workflow.
Transcription Workflow Tips
Effective transcription is about having a workflow that lets you capture notes quickly and verify them thoroughly. The approach you learned in Chapter 2 for tackling difficult passages works perfectly for transcription work too.
Starting with the Transcription Playhead
The Transcription Playhead is your most valuable tool when entering notes. When you enable it in the toolbar, it locks the playback start position so that every time you press Play, the music starts from the same spot. This means you can listen to a phrase, enter a note, press Play to hear it again, adjust your work, and repeat—all without manually repositioning the playhead each time.
Here's the typical workflow:
- Navigate to the beginning of the passage you want to transcribe
- Enable the Transcription Playhead
- Press Play and listen to the phrase
- Click on the spectrogram to find the pitch (using the audible feedback)
- Drag to create the note entry
- Press Play again—it automatically starts from the saved position
- Verify your note entry sounds correct alongside the recording
- Move forward in the song to the next note
- Toggle the Transcription Playhead off and back on to save the new position
- Repeat the process
This workflow eliminates the constant back-and-forth of repositioning the playhead, letting you focus entirely on identifying and entering notes. When you're working through a fast solo or intricate melody, this consistency is invaluable.
You can combine the Transcription Playhead with Markers to work through a longer passage systematically. Place Markers at the beginning of each phrase you want to transcribe, then use the Marker navigation controls to jump between them. Enable the Transcription Playhead at each Marker location to work through the phrase note by note.
Slowing Down to See and Hear Details
Fast passages that blur by at full speed become much clearer when you slow them down to 25-50% speed. At these slower tempos, you have time to see individual notes on the spectrogram and hear exactly what's being played.
The workflow combines slow playback with the spectrogram display:
- Slow the playback to 50% (or lower if needed)
- Play the passage and watch the spectrogram
- Look for the patterns described earlier—bends, slides, vibrato become obvious
- Click where you see notes to hear the audible feedback
- Enter note entries where the feedback matches what you're hearing
- Gradually increase the speed to 75%, then 100%
- Listen at each speed to verify your note entries still sound correct
What you see at slow speeds often reveals details you'd miss at full tempo. A note that seems like a single pitch might actually be a quick bend. What sounds like a single note might be two notes played in rapid succession. The spectrogram shows these details clearly when time is stretched out.
As you increase the speed back toward 100%, you're verifying that your transcription holds up at the actual performance tempo. If something sounds wrong at faster speeds, slow back down and look more carefully at that section.
Using Regions to Verify Your Work
Once you've entered notes for a section, create a Region around that passage and make it active for looping. This lets you hear your work repeatedly while you refine it.
The Mixer becomes essential during verification:
- Balance both: Play the loop with both the recording and your note entries at normal volume. Do they align rhythmically? Are the pitches correct?
- Isolate your notes: Turn down the recording volume and listen to just what you've entered. Does it sound like the melody when played alone? This makes mistakes obvious.
- Focus on the original: Turn down your note entries and listen to just the recording. Can you identify any notes you missed or got wrong?
This approach mirrors the practice loop workflow from Chapter 2—you're using Regions to focus on one section at a time, refining it until it's correct before moving on.
If you find mistakes during verification, adjust the note entries as needed. Change pitches by dragging notes up or down, adjust timing by dragging notes left or right, or modify duration by dragging the right edge of a note entry. Then loop the Region again to verify your changes.
Marking Passages to Return To
As you work through a song, you'll encounter sections that are particularly challenging or that you can't quite figure out yet. Use Markers to flag these locations so you can easily return to them later.
Place Markers at:
- The beginning of passages you've started but haven't finished
- Spots where you've entered notes but aren't confident they're correct
- The fastest runs or most complex passages to tackle when you're fresh
- Sections where multiple instruments overlap and you want to isolate each part
When you open the Project later, navigate between your Markers to quickly jump to the work that still needs attention. This is especially valuable for longer transcription projects that span multiple sessions.
You can also combine Markers with Regions—create a Region around a section you're working on and give it a descriptive name like "Guitar solo" or "Bridge melody." This gives you both the quick navigation of Markers and the labeled organization of Regions.
When to Trust Your Eyes vs. Your Ears
The spectrogram is an incredibly powerful tool, but it has limitations. Knowing when to rely on the visual display versus your ears will save you time and prevent mistakes.
Trust the spectrogram when:
- Working with clean, single-note lines from guitar, piano, or vocals
- Identifying sustained notes where the pitch is steady
- Spotting techniques like vibrato, bends, and slides
- Verifying the timing and duration of notes you've already identified by ear
- Working with passages where the mix is sparse and the target instrument is prominent
Trust your ears when:
- The fundamental frequency is missing (harmonics only)
- Working with dense mixes where multiple instruments overlap
- Dealing with distorted instruments where harmonics dominate
- Processing heavily affected sounds (reverb, delay, extreme EQ)
- Encountering percussive transients that create visual noise
- The spectrogram pattern doesn't match what you clearly hear
Remember the golden rule: ears first, spectrogram second. Use your hearing to identify the pitch, use the audible feedback to verify it, and use the spectrogram to refine timing and placement. Your ears tell you what notes are being played; the spectrogram shows you when and how they're being played.
With practice, you'll develop an intuition for when the spectrogram is trustworthy and when to rely more heavily on your ears. Every recording is different—clean studio recordings with good separation give you an accurate spectrogram, while lo-fi recordings or dense mixes require more careful listening.
Exporting Your Work
When you've finished transcribing a passage, you can export your note entries as a MIDI file for use in notation software or other digital audio workstations. The MIDI export includes both your note entries and Capo's detected chords, giving you a complete representation of what you've learned.
For complete details on exporting MIDI files and other formats, see Chapter 7: Sharing Your Work.
What You've Learned
You now understand how to read Capo's spectrogram display, enter and verify note entries with audible feedback, use the Mixer to compare your note entries with the original recording, and develop an efficient workflow using Regions, slow playback, and the Transcription Playhead. If you're a guitarist, you also know how string positions can help you quickly locate notes on the fretboard.
Note entries in Capo serve as memory aids and learning tools—they document what you've figured out and play back synchronized with the recording so you can verify your work. While Capo doesn't produce publication-ready tablature with advanced notation, it provides exactly what you need to remember your progress and build your ear training skills. As you continue working with the spectrogram, you'll develop faster pattern recognition and a deeper understanding of how different instruments and musical passages appear visually.
Last updated: October 08, 2025