Your First Song in 15 Minutes
Let's jump right in and get you learning your first song. You'll be surprised how quickly Capo can help you figure out what's being played.
Loading a song into Capo
First, you need to get a song into Capo. You have two options:
From your Music library:
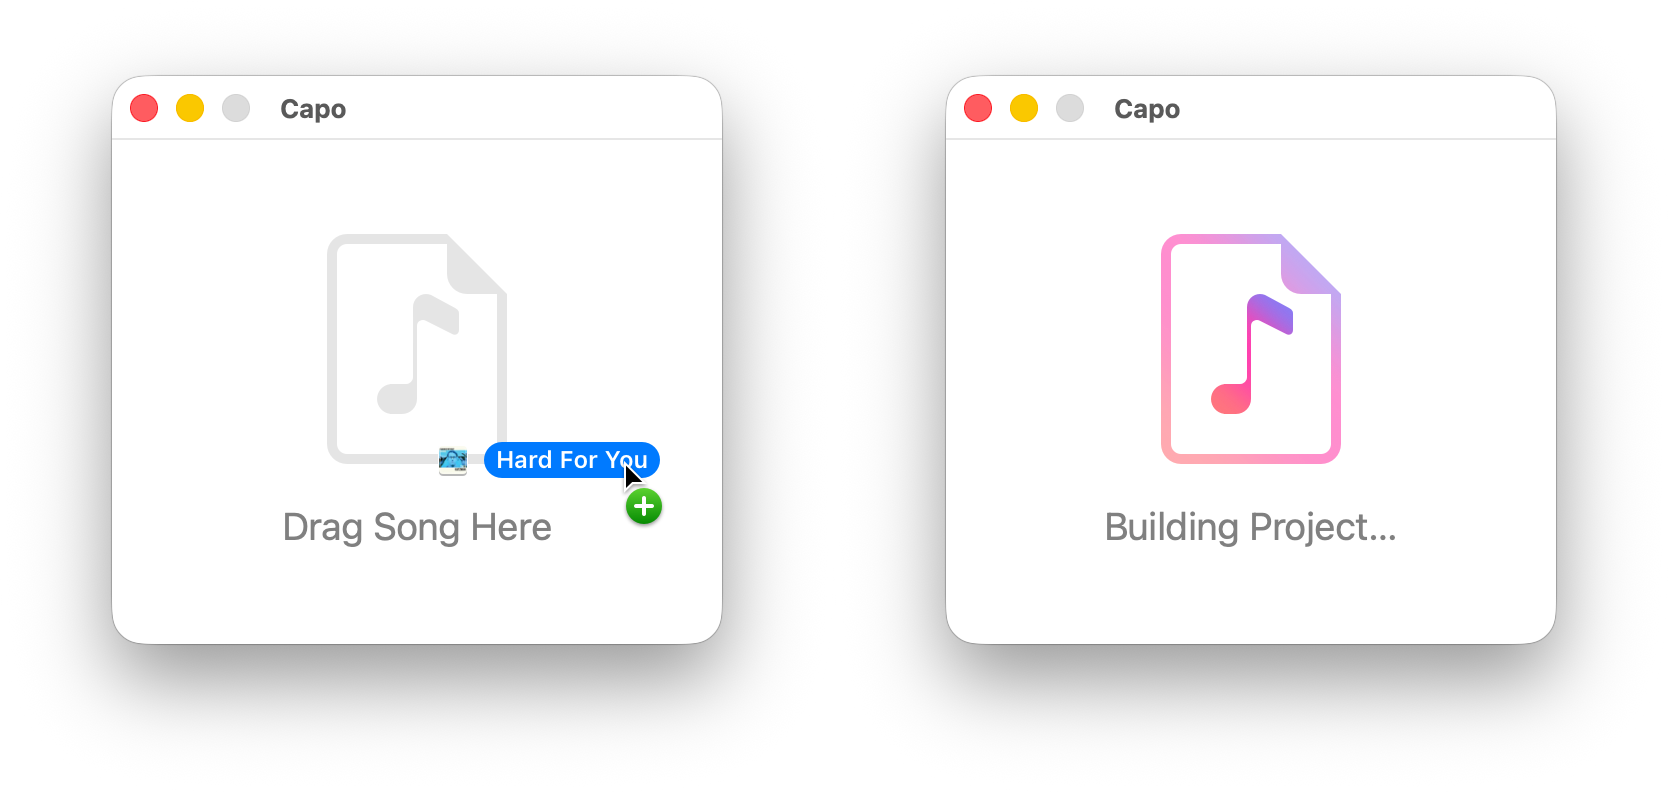
If the song is in Apple Music and you've purchased it from iTunes (i.e., you're not just streaming it), simply drag the song from Music onto Capo's window. You can also drag it onto Capo's icon in the Dock.
From an audio file:
If you have an MP3, WAV, AIFF, or M4A file on your computer, either:
- Drag the file from Finder onto Capo's window
- Choose File > Open… from the main menu and locate your file
Note: Capo can't play songs protected by DRM, including most streaming-only Apple Music tracks. You'll need to purchase the song from the iTunes Store first.
Once you've loaded a song, Capo gets to work analyzing it—detecting the tempo, finding all the beats, and identifying the chords. This usually takes just a few seconds. When it's done, you'll see your song ready to explore.
Understanding What You're Seeing
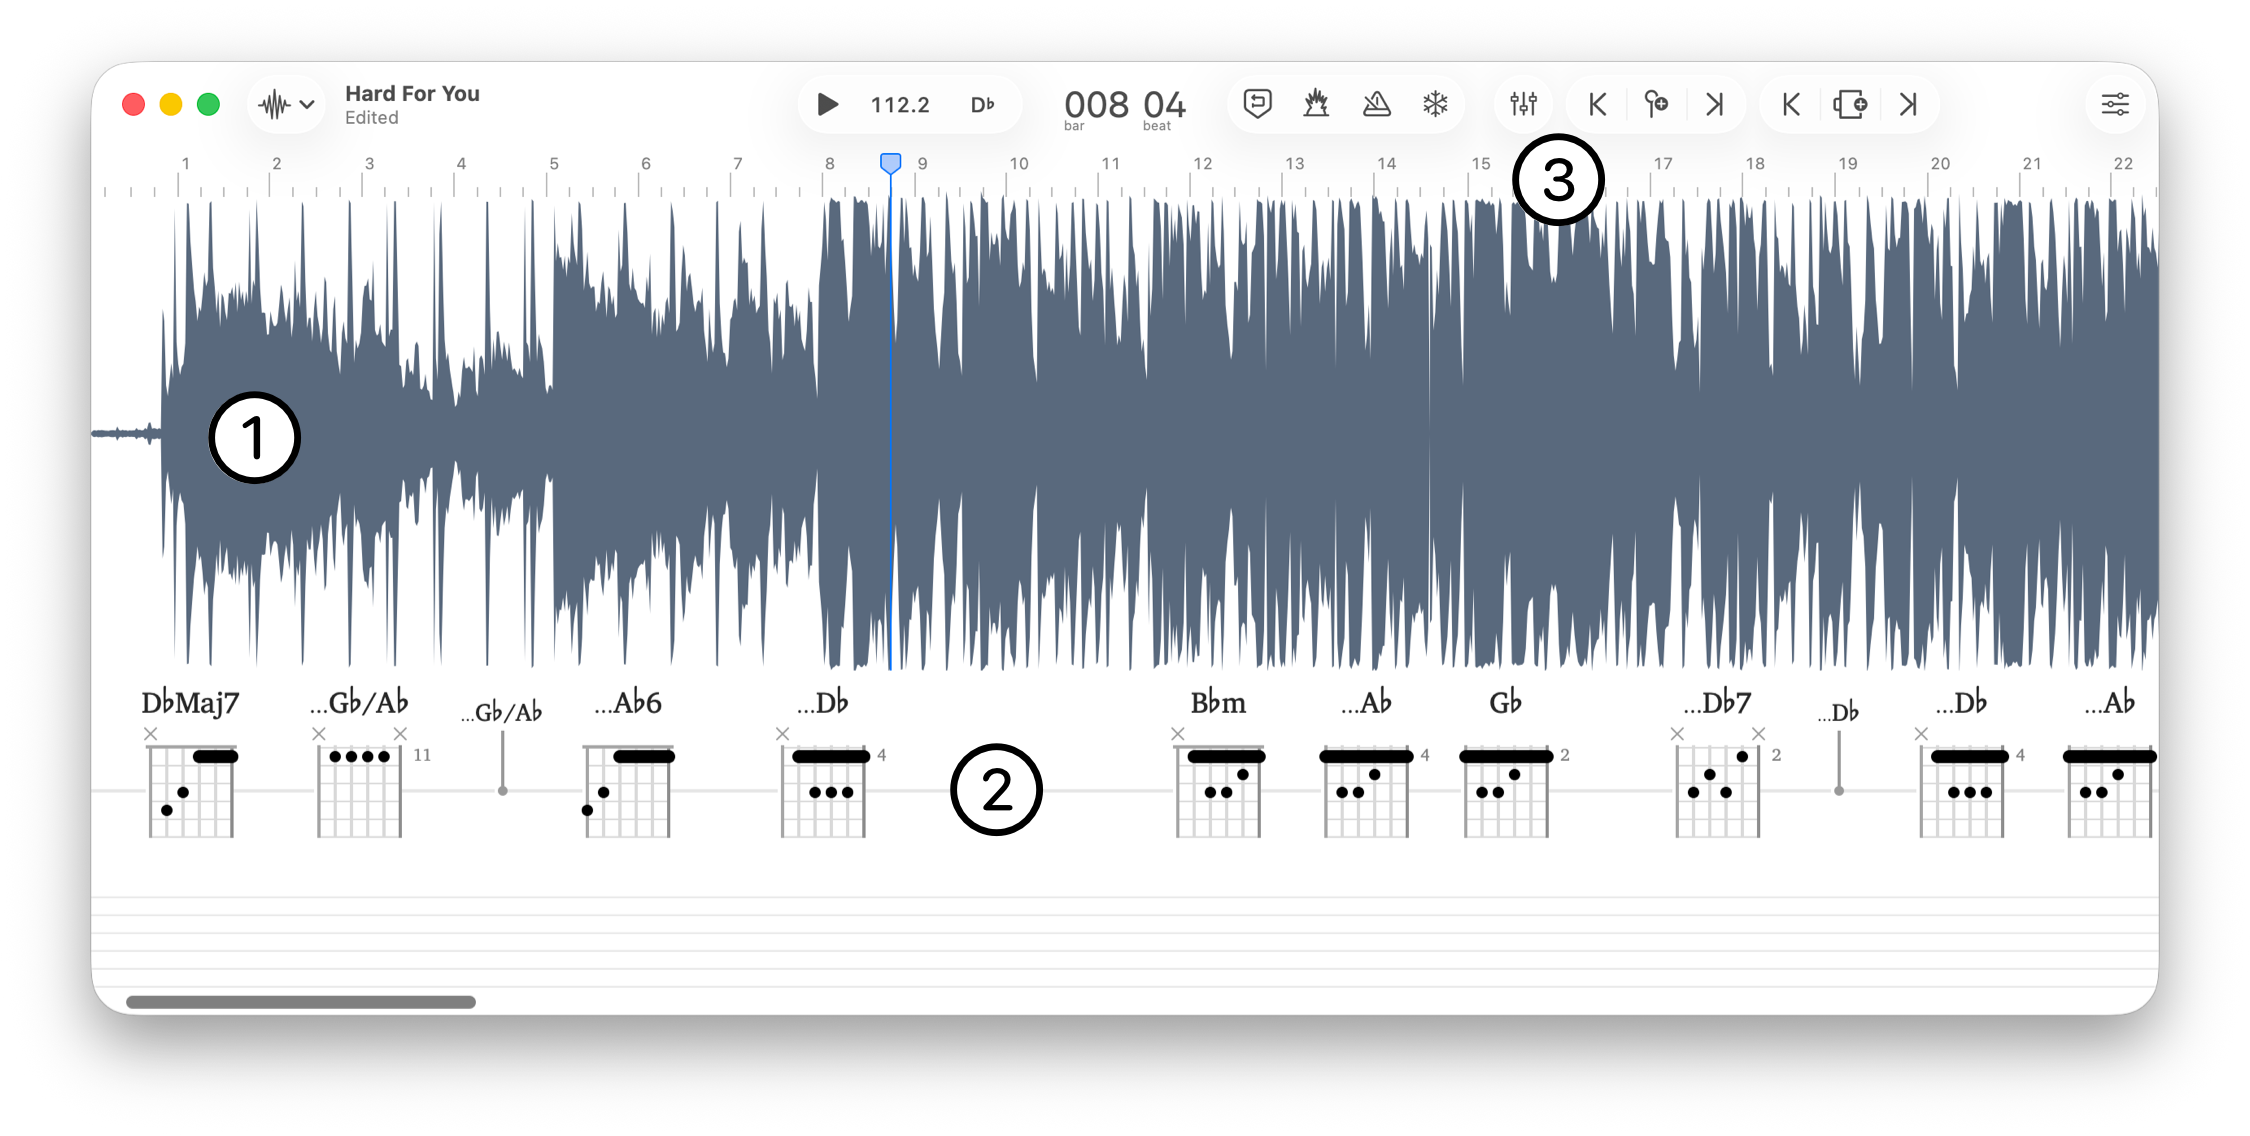
When Capo finishes loading your song, you'll see three main areas:
- The waveform ① visualizes the song's audio—louder parts are taller, quieter parts are shorter. The vertical line running through the waveform is the playhead—it shows where you are in the song.
- Chords ② appear below the waveform. Capo has detected these automatically by listening to the song. They're positioned exactly where they change in the recording. Each chord shows you the name and a diagram of how to play it.
- The timeline ③ runs along the top, showing you time positions (like 0:30, 1:00) or bar numbers (like 5, 6), depending on your preference. Click on the position display in the toolbar to switch between them.
At the top of the window is the Toolbar, which contains all your playback controls. Think of it as your command center for learning the song.
Basic playback controls
Hit the spacebar (or click the play button in the toolbar) and the song starts playing. Hit spacebar again to stop. That's the most important control—you'll use it constantly.
Notice the playhead moving across the waveform as the song plays. You can click anywhere in the timeline above the waveform to jump to that spot. Try it now—click somewhere in the middle of the song, then press spacebar to play from there.
Want to skip ahead or back? Use these keyboard shortcuts:
- ⌘←: Jump to the beginning
- ⌘→: Jump to the end
- ← or →: Move backward or forward by a bar
- ⇧← or ⇧→: Move backward or forward by a beat
Slowing down without changing pitch
Here's where Capo's magic starts. If you look in the toolbar, to the left of the position display, you will see the play button, and a number to the right of it: that's the tempo of your song, and clicking on it reveals the speed controls.
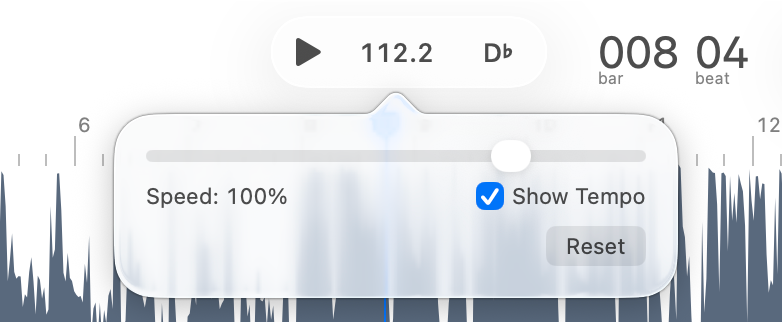
Try this: Start the song playing, click the tempo button in the toolbar, and then drag the speed slider to the left. The song slows down, but the pitch stays the same—the guitar doesn't suddenly sound lower, the singer doesn't sound like they're underwater. This is the technology that makes Capo special.
You can slow the song down to 25% of its original speed. That fast guitar lick that's been driving you crazy? At 25% speed, you can hear every single note clearly.
Want to speed it up? Drag the slider past 100% (up to 150%) to practice playing faster than the original.
Of course, keyboard shortcuts will let you work more quickly:
- ↑ or ↓: increase or decrease speed by 25%
- ⇧↑ or ⇧↓: increase or decrease speed by tiny 1% increments
Following along with detected chords
As the song plays, watch the chords at the bottom of the screen. The current chord is the one that lines up with the playhead.
The chord diagrams show you exactly where to put your fingers on the guitar fretboard. If you play a different instrument, don't worry—we'll show you how to change these displays in the next section.
Try this exercise:
- Start the song playing at 50% speed
- Watch the chord diagrams as they pass by
- Try to play along on your instrument
- When you miss a chord change, press spacebar to stop, click back to just before that chord, and try again
You've just learned the basic Capo workflow that thousands of musicians use every day.
Setting Up Your Workspace
Capo is flexible—it can adapt to how you like to learn and what instrument you play. Let's customize it for you.
Choosing the Right Song View for Your Goal
Capo offers different "views" of your song, each designed for different tasks. You'll find the song view selector at the top-left corner of the window in the toolbar.
The Practice song view (what you're probably looking at now) is perfect for most learning. It shows a large waveform with chords below it, and optionally displays tablature at the very bottom. This is your go-to view for learning songs by ear and playing along.
The Tabbing song view is for users who want to transcribe parts note-by-note. It includes a spectrogram display that lets you see the individual frequencies of notes being played. Unless you're planning to tab out a solo, you can skip this view for now.
Structure gives you a bird's-eye view of the entire song. You'll see all the bars laid out, which you can organize into sections like "Intro," "Verse," "Chorus," and "Bridge." This is incredibly helpful for understanding how a song is put together.
The Chords song view is what you'll use when you've learned the song and just want the chords in front of you while playing. It's like a clean, easy-to-read chord chart that follows along with the music.
For your first song, stick with the Practice song view. You can press ⌘1 on your keyboard to make sure you're there.
Adjusting the Chord Display for Your Instrument
By default, Capo shows guitar chord diagrams. But maybe you don't play guitar, or maybe you'd prefer to see chord names only. Let's fix that.
In the Practice, Tabbing, or Chords song view, click on the settings button in the toolbar at the top-right of the window to show the notation settings.
Chords section:
- None: Hides all chord information (useful if you're just focusing on rhythm or melody)
- Names Only: Shows chord names without diagrams—clean and simple
- Chord Boxes: Guitar-style diagrams (the default)
- Simple Piano: Keyboard diagrams showing which keys to press
Size section:
Choose between Regular and Large. If you're sitting far from your screen while playing, Large can be a lifesaver. Try both and see what works for you.
Notes section:
- Tablature: Shows guitar tab notation at the bottom
- None: Hides tablature entirely
Most beginners start with Chord Boxes at Regular size, with Tablature turned off. You can always change this later.
Setting Your Capo Position (Guitarists)
If you play guitar, one of Capo's best features is right in its name. The app can adjust chord diagrams for a physical capo on your guitar. In the Notation Settings panel (click that gear icon again if you closed it), find the Capo dropdown menu in the Instrument section. Let's say the song is in A, but you'd rather play it with a capo on the 2nd fret using G-shaped chords. Select "2nd Fret" from the Capo dropdown. Watch the chord diagrams change—they now show you the shapes to play relative to your capo position. The displayed chord names still show what's actually sounding (A, D, E), but the diagrams show what you play (G, C, D shapes). This is exactly how real guitarists think about capo'd songs. Try different capo positions to find shapes that are comfortable for your hands and voice (if you're singing).
Configuring Other Instruments
Not a guitarist? Capo also supports bass, mandolin, ukulele, and banjo chord diagrams. Even if you play piano, we still have you covered with our simple piano diagrams. And if you play something completely different, or you're already experienced with playing chords, you can save screen space and just show chords by name.
In the Notation Settings, find the Instrument dropdown. Select your instrument, and the chord diagrams automatically adjust:
Piano players: Capo displays simple piano keyboard diagrams showing which keys "belong" to the chord. The visual layout matches one octave of a piano keyboard, but it's meant to be a starting point: the filled-in key is the bass note, and the other keys can be played in any order that fits your playing and listening tastes.
Bass players: Capo shows 4, 5, or 6-string bass chord voicings. It might be uncommon to strum chords, but the diagrams can be useful for finding nearby notes to build bass lines around.
Ukulele players: Chord diagrams show the four strings in standard ukulele tuning (G-C-E-A). The high-G string is accurately reflected.
Mandolin players: Diagrams display the paired string courses typical of mandolin.
Banjo players: A number of 5-string banjo tunings are supported.
For fretted instruments, multiple tuning options are available in the Tunings dropdown. Select the tuning you actually use, and Capo adjusts both chord diagrams and tablature accordingly.
Projects: Your Learning Sessions
How Capo Saves Your Work
When you load a song into Capo, you're creating a Project. Think of a project as a learning session that's automatically saved.
Here's what Capo remembers in every project:
- Where you were in the song (playhead position)
- Your speed setting
- Your key/pitch adjustments
- The song view you were using
With a subscription, Capo also saves:
- Any chord edits you make
- Regions you create for looping
- Markers you place
- Sections you define
- Notes you transcribe in the spectrogram
- Your instrument and tuning settings
Without a subscription, Capo still saves the baseline chord detection and your playback configuration (speed, key, pitch, position), so you can resume learning where you left off. But any edits you make to chords, regions, or structure won't be saved.
Reopening Projects and Picking Up Where You Left Off
When you quit Capo, your project is saved automatically using macOS's standard document system. To reopen a project, use File > Open from the menu bar, or access recent projects from File > Open Recent. You can also reopen your most recent project by relaunching Capo.
Projects are saved wherever you choose to save them—there's no default location. If you want to keep your projects synced across multiple Macs, you can save them to iCloud Drive or another cloud storage location.
What's Saved in the Free Version vs. Subscription
Let's be clear about what you get without paying:
Free (no subscription):
- Open unlimited songs
- All playback features (slowing, isolation, key change, pitch adjust)
- Automatic chord and beat detection
- Basic navigation and playback controls
- Your playback settings are saved
What requires a subscription:
- Saving chord edits
- Saving regions
- Saving markers
- Saving sections and changes to the beat grid made in the Structure view
- Saving transcribed notes on the spectrogram
- Exporting audio or MIDI files
Think of it this way: the free version gives you all the core features you need to learn songs from recordings. Use it as long as you'd like—no pressure.
When you're ready to go deeper—fine-tuning chords to match specific voicings, transcribing solos, organizing song structure—that's when it's time to subscribe. But there's no rush. Try the free version, fall in love with Capo, and subscribe only when you're ready to commit.
Last updated: October 10, 2025