If you're sitting at a piano, behind a drum kit, or you play a guitar that's strapped around your neck, it can be awkward to fumble around with a mouse or trackpad. That's why we built the all-new Remote Control system in Capo 4.4.
Note: The remote control system is only available on iPhone and iPad devices running iOS or iPadOS 17 and later.
The world of MIDI hardware is vast, with hundreds of devices to choose from. You might have an 88-key MIDI controller with buttons, sliders, knobs, and drum pads; or, maybe something smaller, like a foot pedal, or a portable controller with a handful of drum pads and knobs. No matter what you have, you can use it to create your own custom, physical remote controller for Capo.
Principles of Operation
In this section we discuss the essential concepts behind Capo's Remote Control system. After reading, you'll know everything necessary to customize Capo's controls to work with your Mac's keyboard and various MIDI control surfaces.
If you're in a rush to get started, jump ahead to check out a few example configurations, and read the instructions for the binding editors.
Command Bindings
A command binding is a connection between a trigger and one or more commands. The commands for a binding are triggered by either a keyboard message (e.g., pressing the K key) or a MIDI message (e.g., control change #30). When a binding is triggered, Capo dispatches its commands. You edit your command bindings in the MIDI and Keyboard Binding Editors.
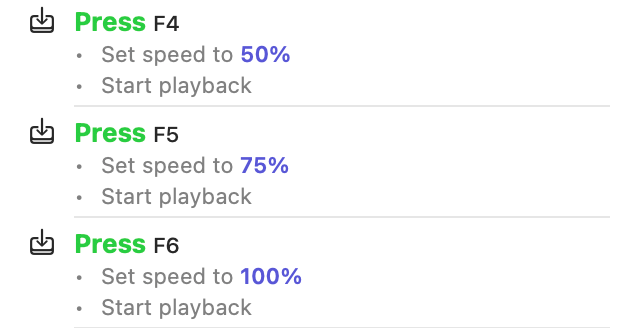
In Capo, a binding can dispatch more than one command. For example, pressing the F4 key could set the playback speed to 50%, and then start playback. Pressing the F5 key could do the same, but at 75% speed, and the F6 key at 100%. These bindings would give you one-touch access to start playback at a preset speed–especially handy when used alongside the transcription playhead.
Keyboard Messages
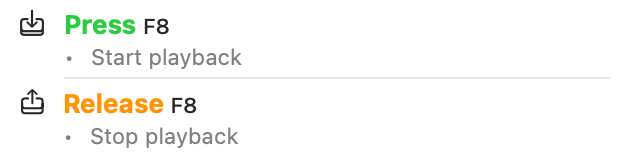
A keyboard message represents either a press (keyDown) or release (keyUp) of a keystroke on your keyboard. Keystrokes can be specified with modifier keys (e.g., control, shift, option), but they are not mandatory–"bare" keys like the numbers 0-9, or [ and ] are easier to operate quickly with one hand. By specifying separate press and release messages, you can create bindings that trigger operations only while the key is held down. For example, you could specify that pressing the F8 key starts playback, and releasing the key stops it.
MIDI Messages
Capo supports the following MIDI messages: note on, note off, control change, program change, start sequence, and stop sequence. Fortunately, you don't need to understand the technical details of these messages, because Capo can automatically learn the messages sent by your hardware, and you can choose triggers quickly. However, there are a couple of behavioural details that you should be aware of.
First, when Capo receives a MIDI message, it must decide which of your bindings to trigger; it does this by matching the incoming message to one of your bindings. Matches can be strict or loose depending on your needs. For example, you might want to trigger commands only when Control Change #5 is received on channel 10, and has a value of 127 (strict). Or, you might instead prefer that Control Change #5 on any channel, with *any *value (loose) will trigger commands. Your choice depends on the MIDI hardware you use, and the kinds of commands you want to trigger.
Second, unlike the messages from your Mac's keyboard, MIDI messages can carry values. For example, playing a piano key softly will send a low value indicating the note's velocity, and playing loudly will send a higher one. Similarly, turning a knob on your MIDI control surface will send lower values when turned counter-clockwise, and higher ones clockwise. In both of these examples, these changing values can be passed along to commands as a variable–for example, by binding a knob to the song's playback speed, or volume.
Commands
As we discussed earlier, a binding will dispatch one or more commands when it is triggered by a message from your Mac's keyboard or a MIDI device. Commands are sent serially (one at a time), in the order they are listed in the binding.
Most commands have one or more parameters that change what the command is doing. All parameters can be configured to have constant values. For example, you can set the playback speed to specific values like 25% or 42%. Or you can specify the target of certain commands, such as changing the volume of either the song or the metronome.
Some commands let you specify variable parameter values, where you let Capo "fill in the blanks" using incoming values from value-carrying MIDI messages. For example, you can set the playback speed using a variable, where values between 0 and 127 (the full range of MIDI values) are translated to a value between 25 and 150%. However, you might not want to set the speed across such a wide range. Fortunately, you can configure Capo to apply this translation over a smaller range, like 50-100%. You can also use variables to change parameters that accept boolean true or false values, like whether or not playback is active, as you'll see in our example configurations.
Example Configurations
Because there are so many different MIDI hardware devices, it's unlikely that we have the same you do. That's why, in the following sections, we provide example configurations using fictional devices that might be similar to your own–they were all inspired by a mixture of real-world hardware from our test lab. Once you're done reading this section, you should feel comfortable setting up Capo to work with your own equipment.
Should you get stuck with your own configuration, you can reach out to the Capo Community and we'll be happy to help you get up and running.
MIDI Foot Pedal
MIDI foot pedals come in many shapes and sizes. Some are simple, with one or two switches; others have more, and let you attach volume and expression pedals. Let's look at an imaginary MIDI foot pedal with four switches, and two jacks for attaching a volume or expression pedal.
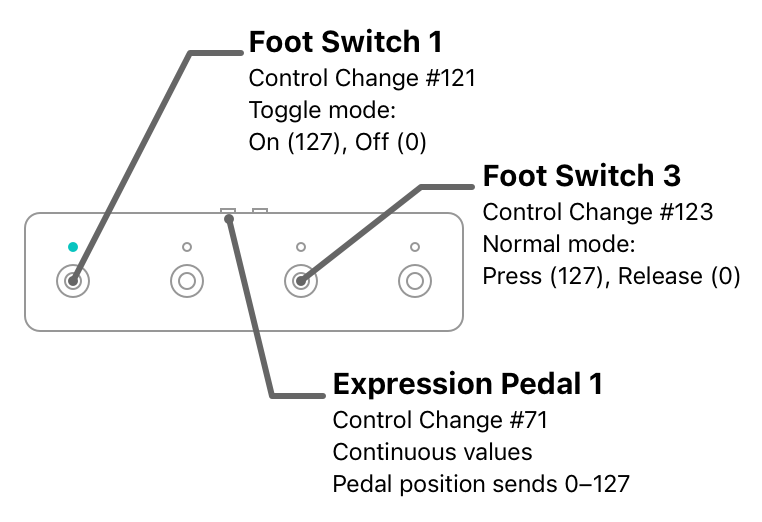
From the factory, this pedal is configured with two different foot switch behaviours. The first two are toggle switches, where pressing and releasing the switch will either turn it ON, or OFF–the state of the switch will remain the same after it is released, with a light that reflects the current state. The second two are normal switches that are in the ON state only while they are held down; they switch OFF once they are released. Regardless of the switch behaviour, the ON state sends a control change message with a value of 127, and the OFF state sends a control change message with a value of 0.
When an expression or volume pedal is attached to either of the jacks on the back of the unit, changing its position will send control change messages with a corresponding value. When the pedal is left all the way up, the value is 0; half-way down sends a 63; and the value is 127 at the bottom of the pedal's travel.
Note: MIDI pedals like these require calibration to work correctly with expression or volume pedals. If you fail to calibrate your hardware, your pedal may never send values all the way to 0 or 127. You can verify that your pedal is working correctly using the learning feature in the MIDI message editor. Consult the product's support materials if you're having trouble with this.
An Example Configuration for Learning Solos
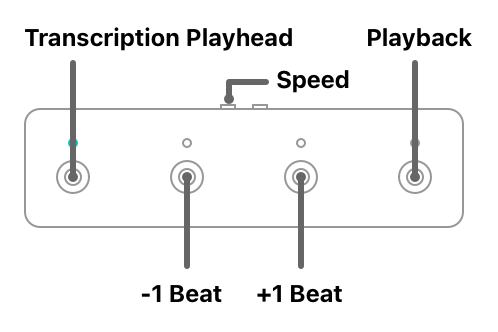
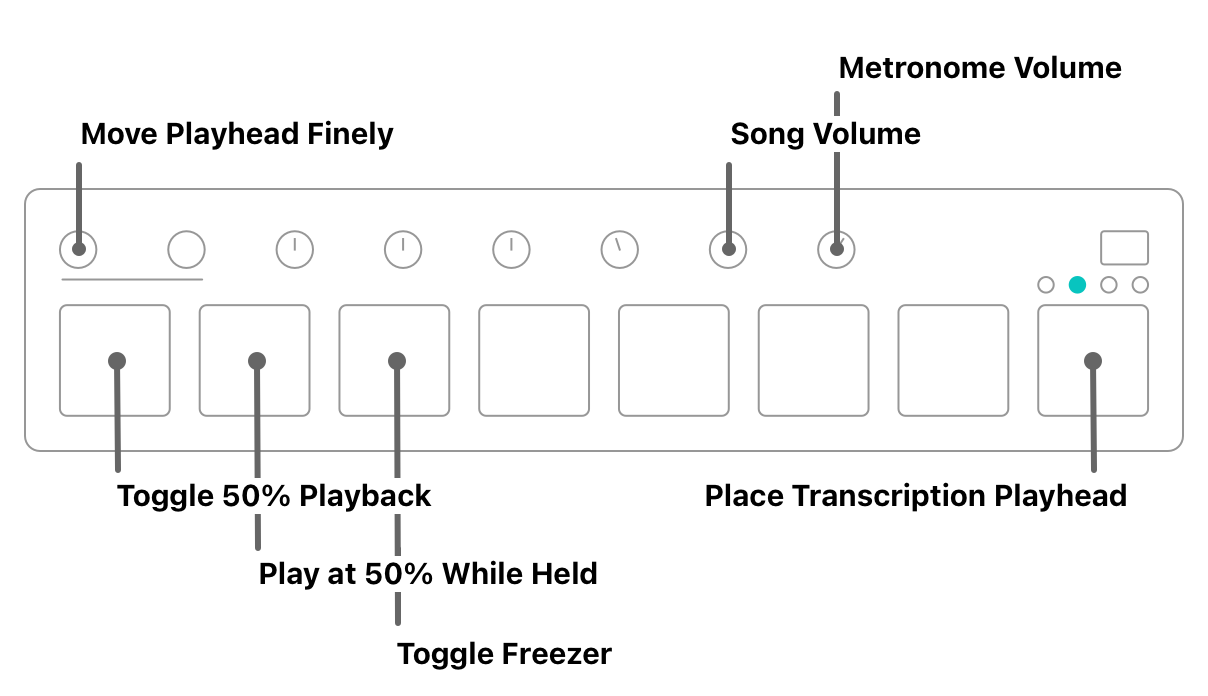
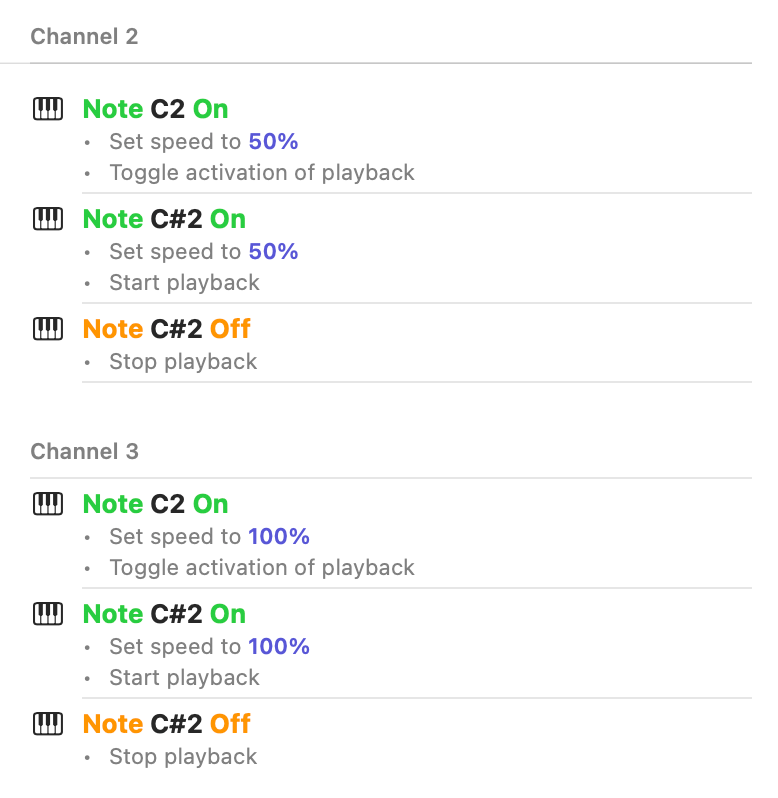
Here, we want the first switch to control the state of the transcription playhead; if the light is on, then the transcription playhead is active. The middle two switches will move the playhead backwards or forwards, one beat at a time. The fourth switch is meant to help us learn the solo in small, bite-sized chunks: while this switch is held down, Capo should play audio; releasing the switch should stop playback. Finally, the expression pedal will control the speed of playback: when all the way down, the song plays at full speed; at the top, it slows to 25%; other positions select the speeds in between.
This is how we would configure these MIDI bindings in Capo.
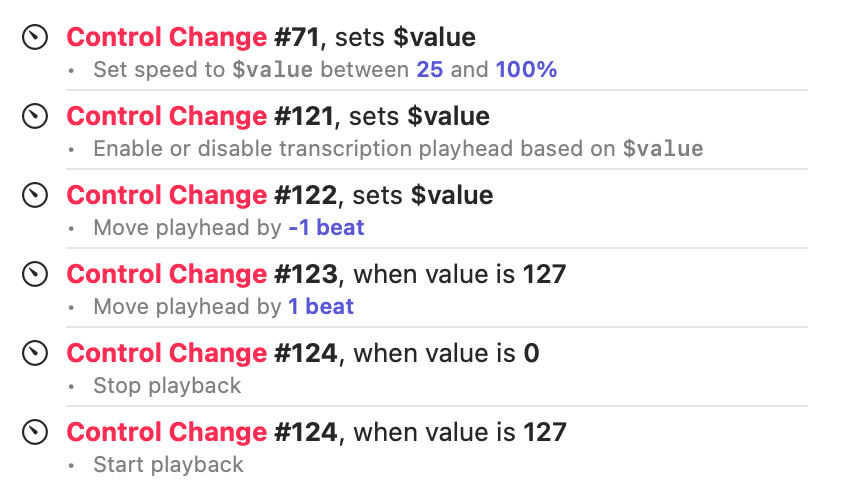
In this list we see the expression pedal (CC #71) followed by the four switches (CC #121-124). The expression pedal is rather straightforward: it is a variable binding that translates values from the pedal (0-127) into a speed of 25-100%.
For the first switch (CC #121), we use a variable binding even though the switch sends only 0 (OFF) or 127 (ON). Capo can translate these values into the correct OFF and ON states for its commands. This is a handy shortcut, but you can also use two separate bindings like we did to configure the fourth switch (CC #124).
Note: This use of variable bindings to control commands with boolean (ON and OFF, or true and false) parameters is most useful with MIDI controls that behave like switches. If you tried to achieve this using a NoteOn event from velocity-sensitive controls, you would have to make sure to activate the control by applying the correct force to send a value larger than or equal to 64 (ON), or smaller (OFF).
You might have noticed that the second (#122) and third (#123) bindings are configured differently, even though they are meant to do the same thing. Recall that the second switch is a toggle, just like the first one: every time the switch is pressed, it alternates between sending 127 (ON) and 0 (OFF). Had we configured this binding exactly like the third switch, the second switch would have to be pressed twice to move backwards. To achieve the desired behaviour, we specify a variable value that we ignore in the command list. That way, Capo will execute the command regardless of whether the switch sends a 0 or a 127–a single press always moves backwards.
Note: In this example configuration, we set all of the bindings to match incoming MIDI messages on any channel. This may not be the correct choice for your hardware, especially if you have many MIDI devices attached at the same time, and you don't want commands to trigger unexpectedly. If you're worried about this happening, be sure to specify a channel for your MIDI message triggers. Use the learning feature in the MIDI Message Editor if you aren't sure what to specify here.
MIDI Control Surface
Control surfaces come in many shapes in sizes. Some look like mixing desks, with an array of sliders and knobs, and others are very compact, with only a few knobs and drum pads. For this hardware example, let's consider the following imaginary control surface.
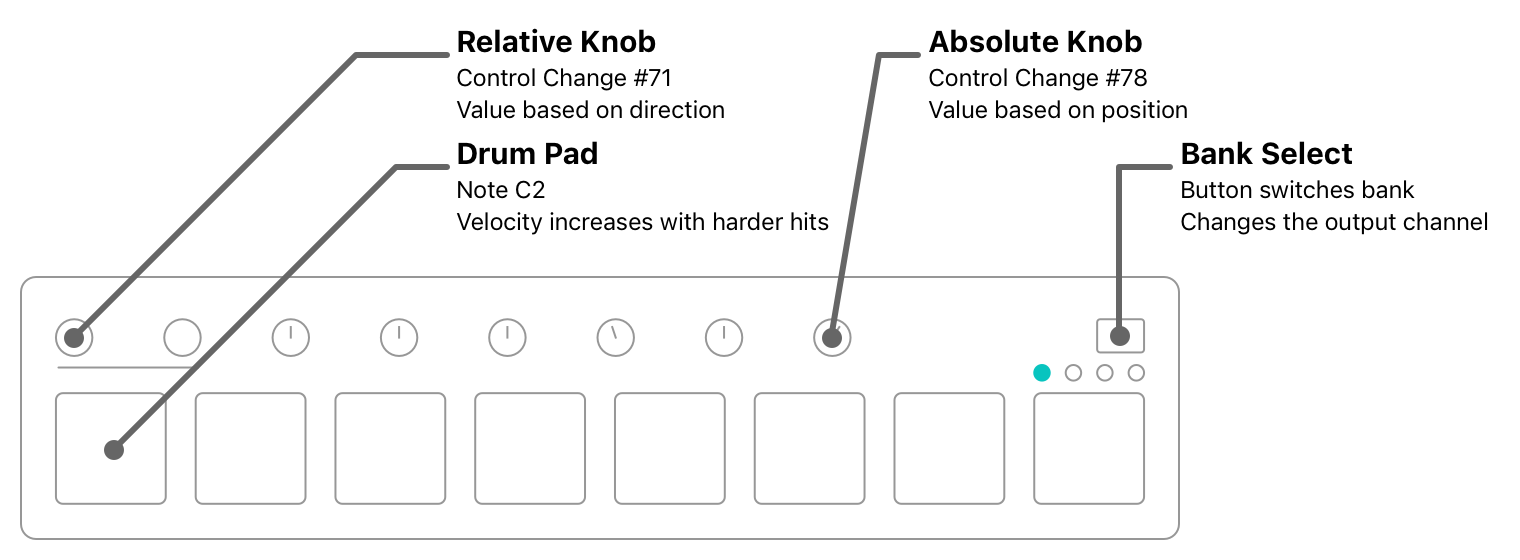
This control surface has eight knobs, eight drum pads, and it offers bank selection–when the bank is changed, the control surface sends different MIDI messages for all 16 of its controls. This gives us a total of 64 different controls that we can use to control Capo.
Notice that the first two knobs are relative; to distinguish their behaviour from the other six knobs, they have no indicator lines, and the manufacturer screened a line below them. With relative knobs, the position doesn't matter–it sends values based on the direction (and speed) of movement. By contrast, a regular knob will always send a value of 0 at the extreme counter-clockwise position, 127 at the opposite end, and 64 in the very middle.
Note: Relative knobs are seldom found on MIDI control surfaces, but they are extremely handy for certain commands in Capo, as you'll soon see.
Like many modern control surfaces, the manufacturer provides software to configure the MIDI messages sent by each of the banks. For example, you might want the drum pads to send specific ControlChange or ProgramChange messages to work with physical MIDI equipment. But if you use Capo, you'll rarely need to adjust these settings because–unlike physical hardware–Capo can be configured to respond to whatever your MIDI controller is sending. So for this example, we're going to make up an imaginary factory configuration, and discuss how you might want to bind these controls in Capo.
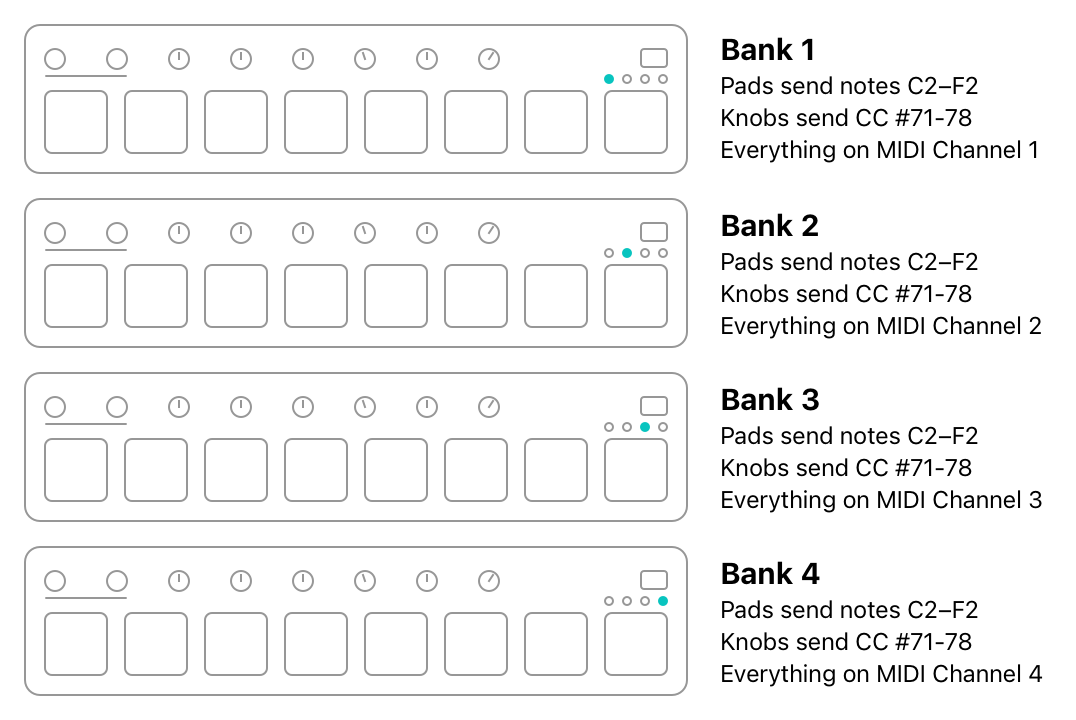
In the factory configuration, each of the eight pads sends a NoteOn or NoteOff message in the same note range of C2-F2. The knobs all send control change messages from #71-78. When the bank is switched, the control surface sends the same messages, only on a different MIDI channel.
If we want to use this factory configuration to its fullest, we can work with a total of 32 drum pads and 32 knobs. But this is a lot to keep track of, and we probably don't need every single control to do what we want. So we're going to use banks to keep everything arranged, and spread the controls out. We're also going to make sure that the last two knobs always do the same thing, in every bank.
An Example Configuration Using Banks for Organization
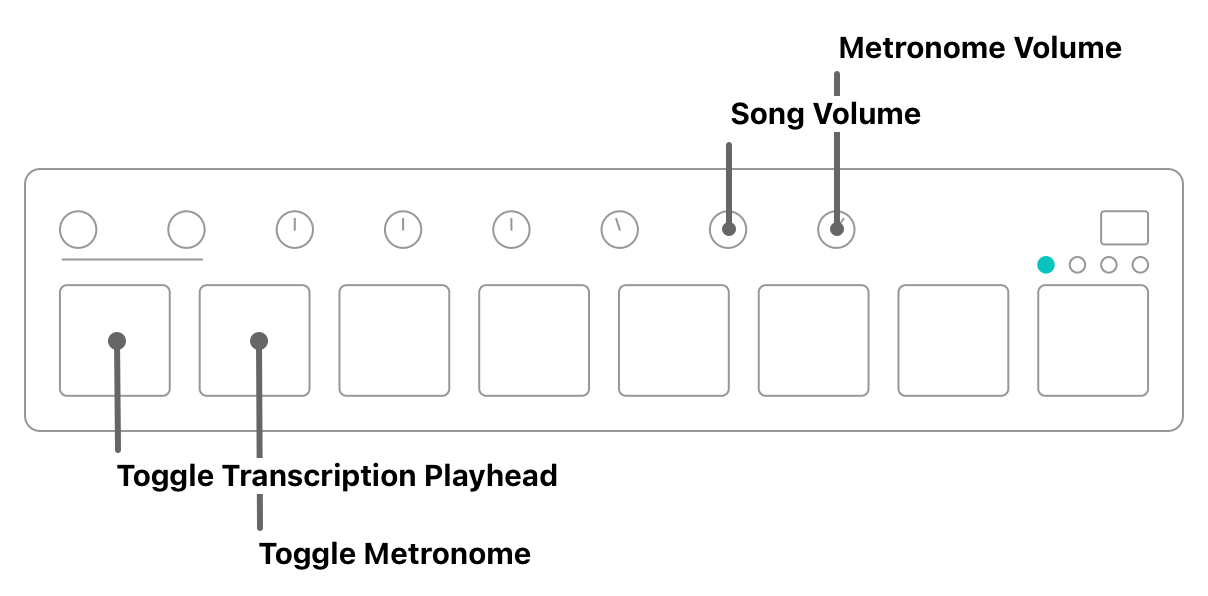
In the first bank, we're going to put a few "global controls" that will let us switch some of Capo's features on and off.
In the second bank, we'll group together our "slow playback" controls to help us learn tricky solos in bite-sized chunks. When we're working in this mode, we're going to use the audio freezer along with the first relative knob to give us access to Capo's scrubbing functionality.
The third bank is where we'll work at full speed, and might be where we start off learning the song. But if we ever hit a tricky spot, we can jump to the second bank to get playback buttons that always play at half speed.
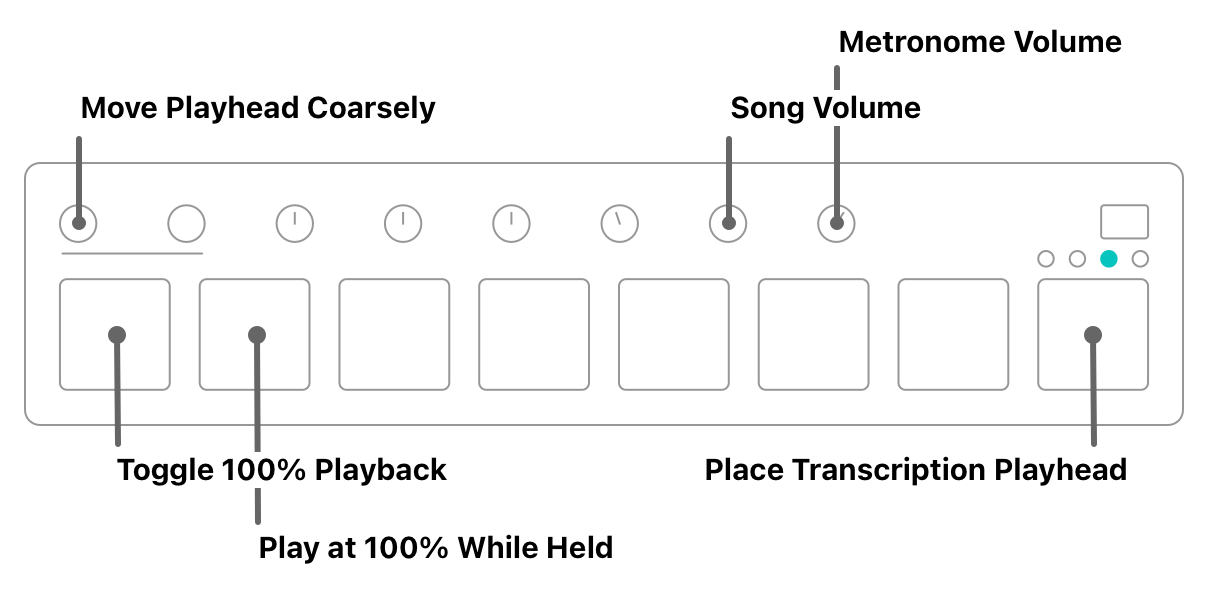
Finally, the fourth bank will hold some useful region controls that'll let us work efficiently when we're in the zone. We pop over to the fourth bank when we need to create, resize, or move regions around. Once we're set, we go back to the third bank to do our playback control.

With this configuration in mind, we now have to set up Capo accordingly. Because we are dealing with many possible controls, we're going to describe their configuration in groups. First we'll start with the two volume knobs.
Volume Knobs
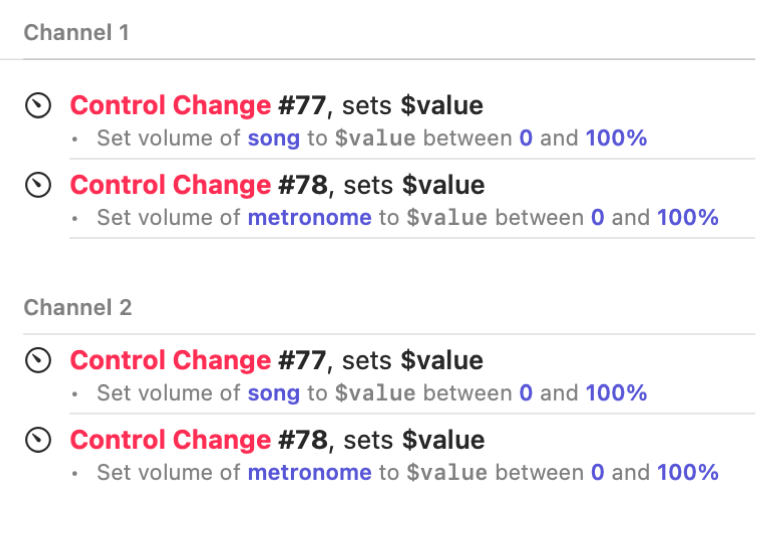
Recall that each bank will send the same messages, but on different MIDI channels. In this case, the last two knobs are sending Control Change messages for #77-78, but bank 1 sends them on channel 1, bank 2 on channel 2, and so on. We could define these bindings separately. Here are the bindings for only the first two banks:
But we don't like to repeat ourselves, so we'll define the triggers so they accept messages on any channel.
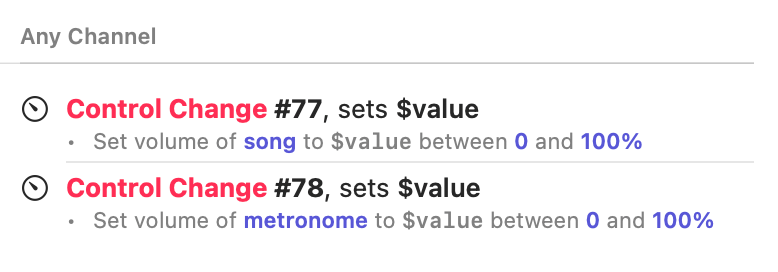
Using this configuration, the last two knobs will always control the volume of the song and metronome, no matter what bank is selected on the device.
Playback Controls With Preset Speeds
There are two kinds of controls for each of the speeds: one that toggles playback at a set speed, and one that plays only while the key is held down. The interesting thing about these bindings is that most will send two commands when they are triggered–one to set the speed, and another to start or toggle playback.
Note: Unlike our MIDI foot pedal example, our drum pads send NoteOn and NoteOff messages; so we can't use variable values to set these up using a single binding.
With this configuration, the first pad will trigger playback at 50% speed in bank 2, and 100% speed in bank 3. The second pad plays audio at its preset speed only while the pad is held down, which is especially useful when the transcription playhead is active.
Movement Using Relative Knobs
In the second and third banks, we use the first relative knob to move the playhead position. In the second bank, this fine adjustment combined with the audio freezer allows us to scrub over the song's audio, and we can listen for individual notes that we want to play on the instrument. Here's what the configuration looks like.
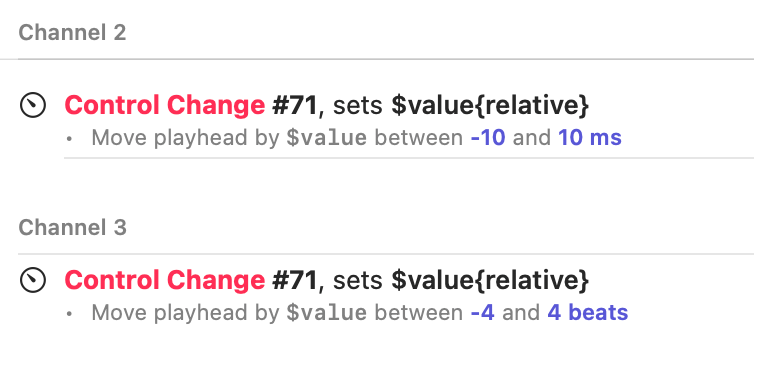
When the knob is activated on the second bank, the playhead is moved by somewhere between -10 and 10 milliseconds, which is a very fine adjustment. Depending on your own MIDI hardware, you might want to play with this range until it feels right to use. On the third bank, the playhead will move much more quickly, aligned with the beat grid, as you turn the knob.
Command Bindings Editor
In Capo, you can create and edit your Keyboard Bindings and MIDI Bindings from the same place.
To show the Command Bindings Editor, do one of the following
- Choose Control > Edit Keyboard/MIDI Controls… from the main menu
- Or, press control-command-L on your keyboard
MIDI Bindings
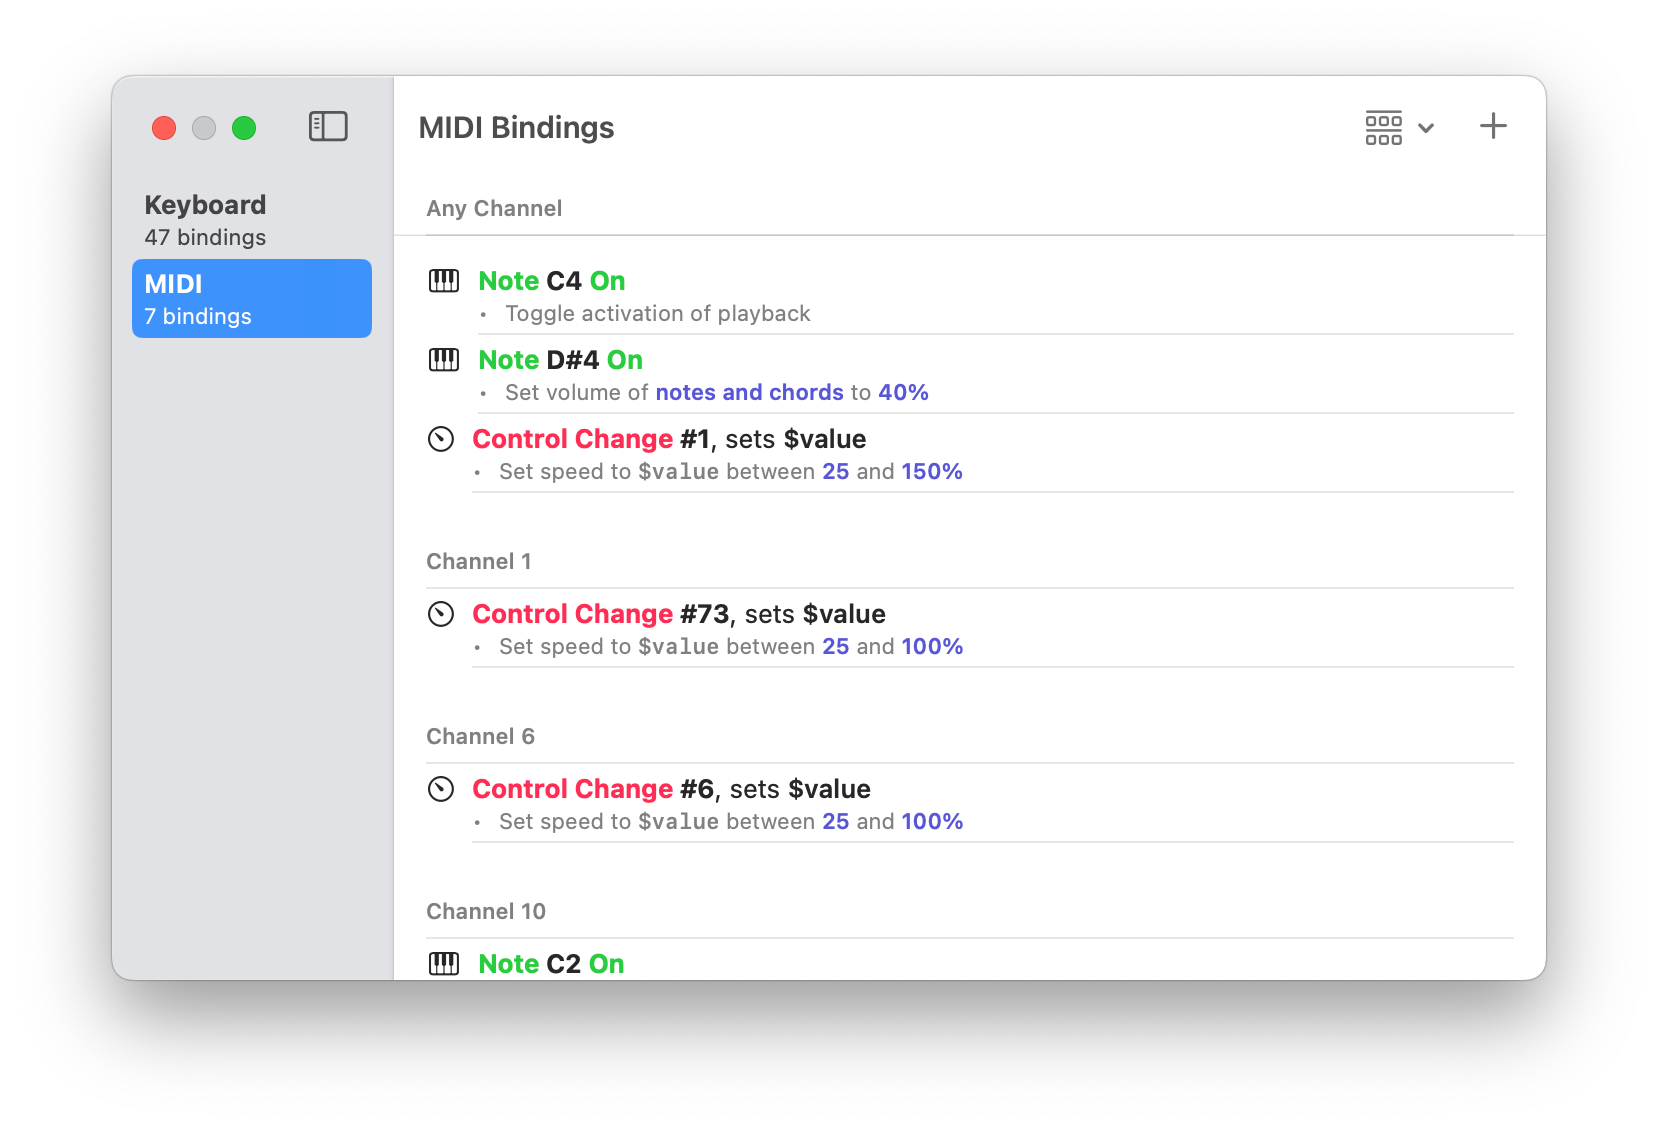
To show the MIDI Bindings Editor
- Select MIDI in the sidebar of the Command Bindings Editor
MIDI bindings always appear in sorted order, but you might want to rearrange the listing so that bindings are grouped together by channel, by message type (e.g., Note On, Control Change), or with no grouping.
To change the grouping of MIDI Bindings
- Click the grouping icon at the top-right of the MIDI Bindings editor window
- Select the desired grouping
MIDI Binding Editor
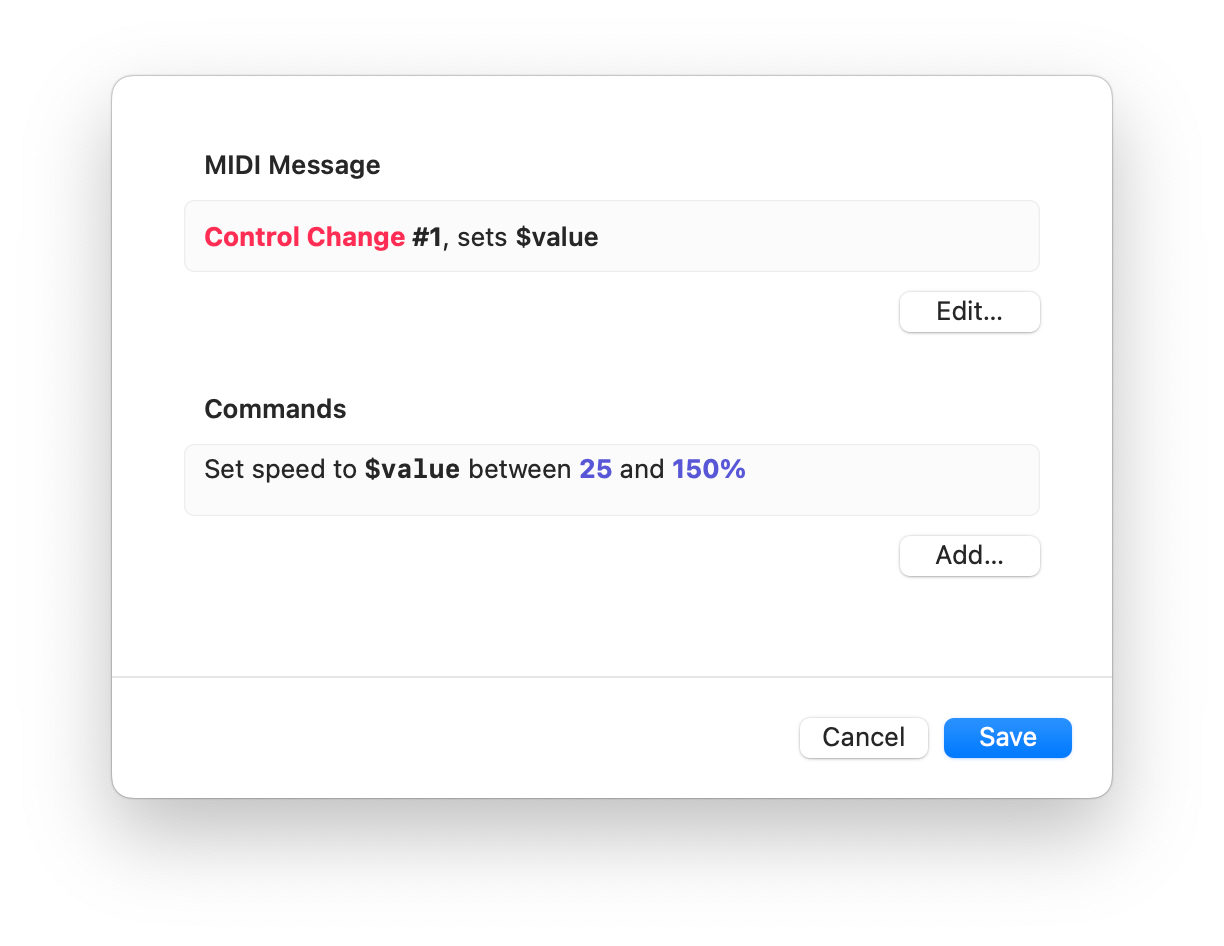
When you create or edit a MIDI binding, you choose a MIDI message, and a list of commands that get triggered when the message is received.
To access the MIDI Binding Editor, do one of the following
- Double-click one of the bindings in the MIDI Bindings list
- Right-click a binding in the list, and choose Edit… from the menu
- Or, click the add button at the top-right of the list
To choose a MIDI message for a new binding
- Click on the Set… button that appears underneath the MIDI Message area of the window
To change the MIDI message for a binding
- Click on the Edit… button that appears below the MIDI Message area
MIDI Message Editor
The MIDI Message Editor appears when you set the message that triggers a MIDI binding, or when you edit an existing one. Here you can configure the message manually by choosing its Kind (e.g., Note On, Note Off, Control Change) and adjusting its related parameters. However, you can configure messages more quickly if you use the Learning MIDI Message Chooser.
To show the Learning MIDI Message Chooser
- Click on the Learn button in the MIDI Message Editor

In the Learning MIDI Message Chooser, you can interact with controls on your MIDI hardware–knobs, sliders, keys on a keyboard, or drum pads–and the list of MIDI messages will update and select the last message that was received. When interacting with knobs and sliders, the item remains selected in the list with updates to its value to reflect what you're doing with the MIDI hardware.
To save the selected message in the Learning MIDI Message Chooser
- Click on the Save button to return to the MIDI Message Editor
- Note how the kind of message and its parameters have all been filled in for you
After using the Learning MIDI Message Editor, you might need to modify the message so that it reflects how you wish to use your binding. For example, in the screenshot above, selecting the highlighted Control Change message returns to the following screen.
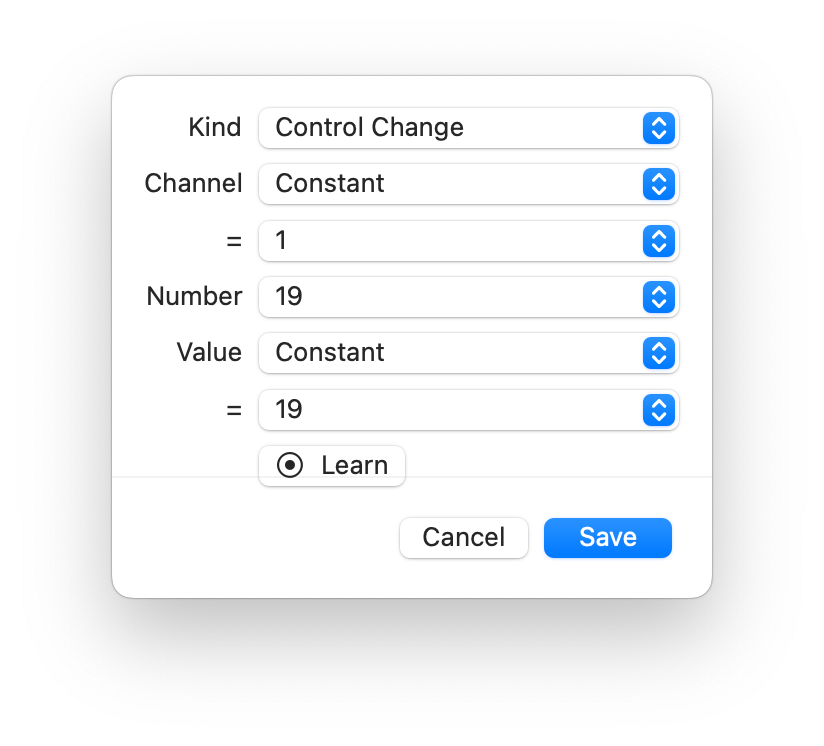
Using the above configuration, the binding will trigger only when all of the following conditions are met:
- The message arrives on channel 1
- The value is exactly equal to 19
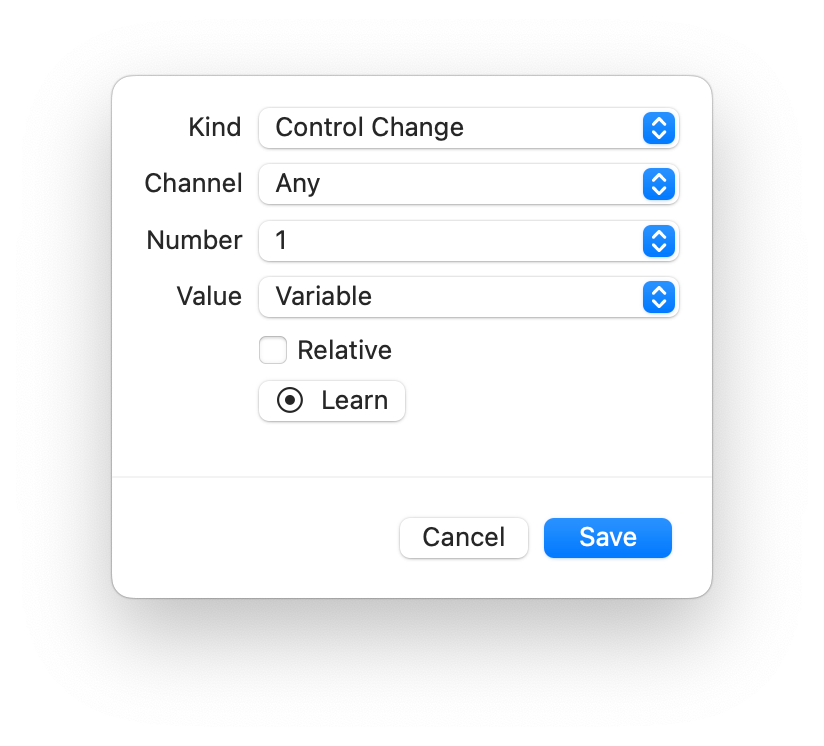
If this message is coming from a slider or knob, you probably want to choose a variable value so that your changes can be applied to something like speed, or the position of the playhead.
To change the value to a variable
- Click on the Value popup button
- Choose Variable
- (Optionally) check the Relative box
Note: Only check the Relative box if you are sure that your hardware has a relative knob.
If you are unsure whether a knob on your MIDI device is relative
- Open the Learning MIDI Message Chooser
- Turn a knob on your MIDI hardware in both directions
- If the value appears to be stuck, and only changes when you switch directions or turn the knob more quickly, the knob is relative.
- Otherwise, the knob only sends absolute values.
Note: Some manufacturers allow relative knobs to be configured so that they operate in specific "modes". This should not matter in Capo, as the software should automatically detect the most common relative knob modes.
Keyboard Bindings
To show the Keyboard Bindings Editor
- Select Keyboard in the sidebar of the Command Bindings Editor
Keyboard Binding Editor
When you create or edit a keyboard binding, you choose a keyboard message, and a list of commands that get triggered when the message is received.
To access the Keyboard Binding Editor, do one of the following
- Double-click on an entry in the list of keyboard bindings
- Right-click a binding in the list, and choose Edit… from the menu
- Or, click the add button at the top-right of the list
To choose a Keyboard message for a new binding
- Click on the Set… button that appears underneath the Keyboard Message area of the window
To change the Keyboard message for a binding
- Click on the Edit… button that appears below the Keyboard Message area
Keyboard Message Editor
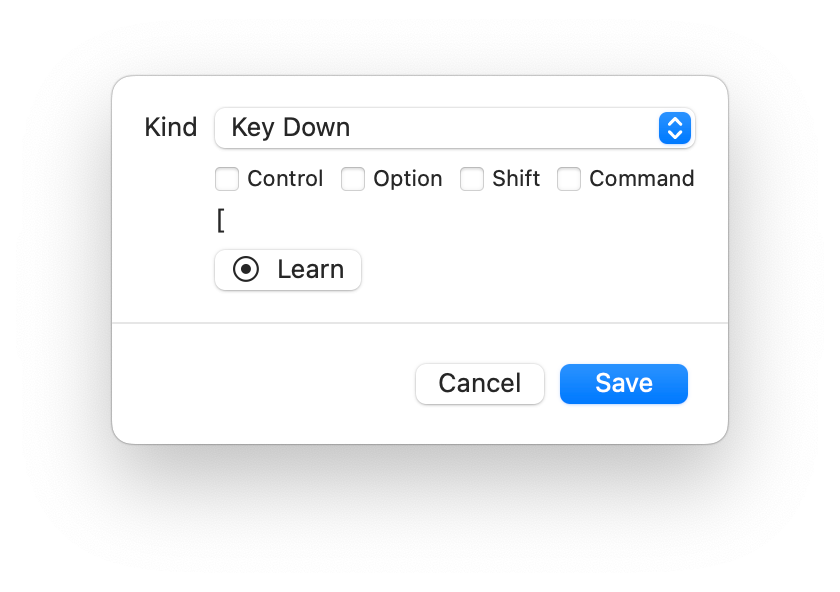
The Keyboard Message Editor appears when you set the message that triggers a keyboard binding, or when you edit an existing one. You can configure some aspects of the message manually by choosing its Kind (Key Down or Key Up) and selecting the modifier keys that must be pressed. However, unlike the MIDI Message Editor, learning is mandatory to configure a keyboard message.
To configure a keyboard message
- Click on the Learn button, and the area above the button will indicate your next keystroke will be recorded
- Press the keystroke you want to use for the keyboard trigger
- If necessary, change the Kind of message, and select or disable modifier keys as needed
- Click the Save button to apply the changes to the keyboard binding
Bindings Commands
At the bottom of the MIDI Binding and Keyboard Binding editors, you'll find the list of commands that are dispatched when the binding is triggered. You can add, remove, rearrange, and edit the commands to suit your binding.
To add a command to the list
- Click the Add… button that appears at the bottom-right of the list
- In the sheet that appears, scroll to find the command you would like to add, and click on it
There are many possible commands you can send to Capo, and they can be configured to have different parameter values. However, because of the large number of possibilities, the Command Chooser can only includes a small number of sample commands for you to choose from. That's why Capo allows you to edit the parameters of commands to better suit your needs.
To edit a command's parameters
- Double-click on the command in the list to reveal the Command Editor
Note that Capo's commands are not all editable. For example, there is nothing you can configure about the command that toggles the state of playback. Fortunately, you can tell whether a command can be edited based on the appearance of dark blue text in the list of commands. For example, the command that sets the speed to 50% will display its editable parameter in bold, with dark blue text.
As stated earlier, you can also remove and rearrange the commands in the list to make them suit your binding. This is important, because these commands are dispatched in the order that they appear in this list.
Note: Due to the immense number of possible commands that can be sent to Capo, and all the different ways you could choose to arrange them, there might be certain combinations that behave strangely. For the most part, there is little harm you can do. But take extra care if you create bindings that include commands where entries (i.e., markers, chords, or regions) are added or deleted. Should you encounter trouble, please share your experiences in the Capo Community.
To remove a command from the list, do one of the following
- Right-click on the command, then choose Delete from the menu
- Or, select the command in the list, then press delete on your keyboard
To rearrange the commands in the list
- Click on the command you would like to move, and drag it to a new position
- Repeat for all the commands that need to be reordered
Last updated: December 19, 2024